
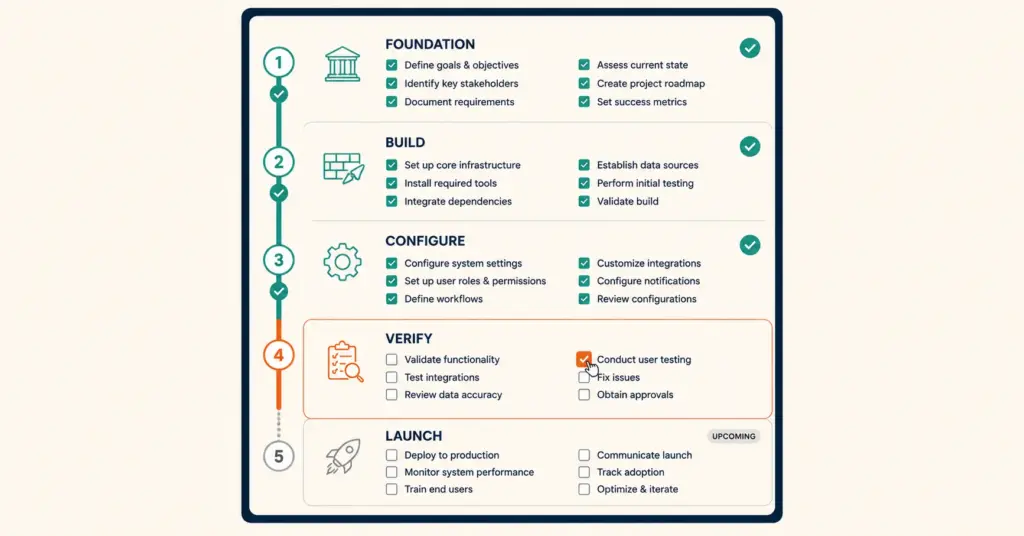
- Launching an ecommerce store involves 30+ discrete tasks across business setup, platform configuration, product pages, payment and shipping, legal compliance, analytics, and marketing. Missing even one (sales tax configuration, shipping rate testing, mobile checkout verification) can silently cost you sales or create legal liability from day one.
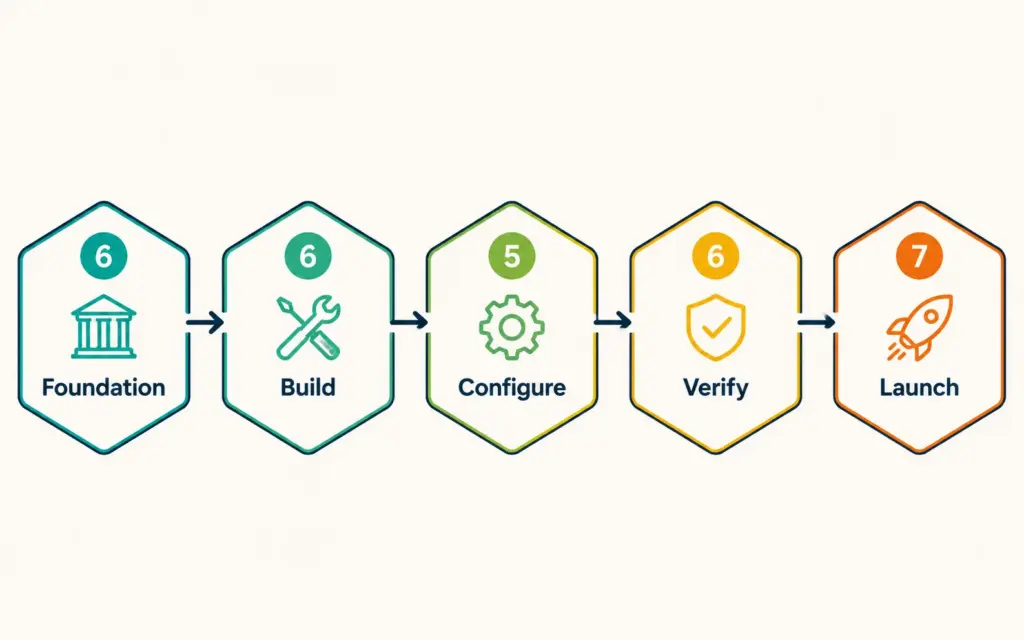
- The checklist splits into 5 phases: Foundation (business registration, platform selection), Build (store setup, product pages, content), Configure (payments, shipping, taxes), Verify (testing, mobile check, legal compliance), and Launch (marketing activation, analytics verification). Complete each phase before moving to the next.
- The 3 most commonly skipped steps that cost new stores the most: not testing a real purchase through checkout (catching payment or shipping errors), not configuring sales tax collection (creating compliance liability), and not setting up conversion tracking (flying blind on marketing spend).
- This checklist works regardless of platform (Shopify, WooCommerce, BigCommerce) because the steps are operational, not platform-specific. Platform-specific setup details live in the linked platform guides.
A first store checklist prevents the launch mistakes that silently kill new ecommerce businesses: the shipping rate that’s wrong, the checkout that breaks on mobile, the sales tax that was never configured, the analytics tracking that never fired. Each item on this checklist exists because stores have launched without it and paid the price in lost sales, customer complaints, or legal exposure. According to Shopify’s new store data, stores that complete a structured launch checklist generate 2 to 3x more first-month revenue than stores that launch ad hoc, primarily because the checklist catches the friction points that prevent early sales from completing.
This checklist is operational, not aspirational. It covers the 30 things you must complete before accepting your first real order. It doesn’t cover long-term strategy, scaling, or optimization, those come after launch. The goal is getting to a working, legally compliant, properly tracked store that processes orders correctly and delivers them on time.
Phase 1: Foundation (Business and Platform Setup)
1. Choose your business structure. Sole proprietorship (simplest, least protection), LLC (personal liability protection, recommended for most), or corporation. An LLC costs $50 to $500 depending on state and protects personal assets from business liability. File with your state’s Secretary of State office. Your business formation approach determines tax treatment and legal exposure for everything that follows.
2. Get your EIN (Employer Identification Number). Free from the IRS website. Takes 5 minutes. Required for business bank accounts, tax filing, and wholesale purchasing. Even sole proprietors should get one to avoid using their SSN on business documents.
3. Open a business bank account. Separate personal and business finances from day one. This is non-negotiable for LLC protection and makes accounting, tax filing, and cash flow tracking dramatically simpler.
4. Register your domain name. Purchase through Namecheap, Google Domains, or Cloudflare Registrar ($10 to $15/year). Choose a .com if available. Keep the domain short, memorable, and spellable. Avoid hyphens, numbers, and creative spellings that force you to spell out the URL verbally.
5. Select your ecommerce platform. Shopify ($39/month) for most new stores: fastest setup, largest app ecosystem, built-in payments. WooCommerce (free + hosting) for stores wanting full customization and lower monthly costs with higher technical involvement. The platform comparison breaks down the tradeoffs in detail.
6. Choose your business model. Dropshipping, private label, wholesale, print-on-demand, digital products, or subscription. Each model requires different setup steps and capital. If you haven’t decided, the model comparison framework filters options by your capital, time, and skills.
Phase 2: Build (Store Setup and Product Pages)
7. Install and configure your theme. Choose a professional, mobile-optimized theme. Free themes (Shopify Dawn, Flavor) work well for launch. Premium themes ($180 to $350) add design flexibility. Avoid themes that prioritize aesthetics over page speed: a beautiful theme that loads in 5 seconds loses sales to a clean theme that loads in 2 seconds.
8. Create essential pages. Homepage, About, Contact, Shipping Policy, Return Policy, Privacy Policy, Terms of Service. These pages build trust, satisfy legal requirements, and answer questions that prevent support tickets. Templates exist within every platform; customize them for your specific policies.
9. Set up your product catalog. Upload product photos (minimum 5 per product, white background main image, lifestyle shots, detail shots), write descriptions using benefit-first copywriting principles, set accurate pricing using the fee-inclusive pricing formula, configure variants (size, color), and set inventory quantities.
10. Optimize product photos. Main image: product on pure white background, filling 85%+ of frame. Supporting images: lifestyle/in-use, close-up details, size reference, and packaging. Compress all images to under 200KB without visible quality loss (TinyPNG or Shopify’s built-in compression). Product pages with 5+ images convert 20 to 30% higher than those with 1 to 2 images.
11. Write compelling product titles and descriptions. Include the primary search keyword in the product title. Lead descriptions with the buyer benefit, not the product feature. Address the 3 most common purchase objections in every description. Each description should be 150 to 400 words depending on product complexity.
12. Create collections/categories. Organize products into logical categories that match how customers shop. Use clear, search-friendly names (“Women’s Running Shoes” not “The Speed Collection”). Aim for 3 to 7 main categories for a new store.
Phase 3: Configure (Payments, Shipping, Taxes)
13. Set up payment processing. Enable Shopify Payments or Stripe (credit cards, Apple Pay, Google Pay). Add PayPal as a secondary option. Consider adding a BNPL option (Klarna, Afterpay) for stores with average products above $75. The payment method mix directly impacts checkout conversion rates.
14. Configure shipping rates. Set up shipping zones, rates, and methods. Options: real-time carrier rates (accurate but complex), flat-rate shipping (simple, predictable), free shipping above a threshold (conversion-boosting). Test every shipping scenario before launch: domestic standard, domestic expedited, heavyweight items, and multiple items. The shipping rate architecture determines whether shipping costs attract or repel customers.
15. Configure sales tax collection. Enable automatic tax calculation in your platform settings. US stores: register for sales tax permits in states where you have nexus (physical presence or economic nexus above state thresholds, typically $100k in sales or 200 transactions). This is a legal requirement, not optional. Uncollected sales tax becomes personal liability. Consider TaxJar or Avalara for automated multi-state compliance.
16. Set up email notifications. Configure transactional emails: order confirmation, shipping confirmation with tracking, delivery notification, and review request (7 to 14 days post-delivery). These are expected by every online buyer. Missing order confirmation emails immediately trigger “Did my order go through?” support tickets.
17. Configure inventory tracking. Enable inventory tracking for every product. Set low-stock alerts at the reorder point for each SKU. Nothing damages trust faster than accepting an order for an out-of-stock product. The inventory management foundation prevents overselling from day one.
Phase 4: Verify (Testing and Legal Compliance)
18. Place a real test order. Complete a full purchase: add to cart, checkout, enter real payment (Shopify refunds test orders), confirm email receipt, verify shipping label generation, check inventory deduction. This single test catches more launch-day problems than any other step. Test on mobile AND desktop.
19. Test on mobile devices. Load every key page on an actual phone (not just browser responsive mode): homepage, product page, cart, checkout. Tap every button. Fill every form. If anything is difficult on a 5-inch screen, fix it before launch. 60 to 75% of your traffic will be mobile.
20. Verify legal pages are complete. Privacy Policy (required by GDPR, CCPA, and most ad platforms), Terms of Service, Shipping Policy (with timeframes and international coverage), and Return/Refund Policy (clear, specific, not hidden). Link all legal pages in the site footer.
21. Check site speed. Run Google PageSpeed Insights on homepage and top product page. Target: 70+ mobile score. Common speed killers: uncompressed images, too many apps/plugins, and bloated theme code. Fix before launch because slow pages lose visitors before they see a single product.
22. Verify SSL is active. Your URL should show “https://” with a padlock icon. Most platforms enable SSL automatically. Without it, browsers display “Not Secure” warnings that stop purchases instantly.
23. Review your return policy against reality. Can you actually fulfill the policy you wrote? If you promise 30-day returns with free return shipping, do you have return labels configured? Can your payment processor issue refunds? Test the full return flow before a customer tests it for you.
Phase 5: Launch (Analytics and Marketing Activation)
24. Install Google Analytics 4 (GA4). Create a GA4 property, install the tracking code, and configure ecommerce event tracking (view_item, add_to_cart, begin_checkout, purchase). Without this, you cannot measure which traffic sources, pages, or products drive revenue. Flying blind on analytics wastes every marketing dollar. The GA4 ecommerce configuration takes 30 minutes and provides lifetime value.
25. Install Meta Pixel and Conversions API. If you plan to run Facebook or Instagram ads at any point, install the Pixel now. It starts collecting visitor data immediately, building retargeting audiences before you spend a dollar on ads. The full tracking stack ensures no visitor data is wasted.
26. Set up Google Search Console. Submit your sitemap. Verify domain ownership. This is how Google discovers your pages and how you monitor search performance. Free, 5-minute setup, required for any SEO visibility.
27. Create core social media accounts. Claim your brand name on Instagram, TikTok, Facebook, and Pinterest (even if you don’t plan to post on all). Consistent naming prevents squatters and builds discovery channels. Post your first piece of content: the product reveal, the brand story, or a behind-the-scenes photo.
28. Build your pre-launch email list. If you haven’t already, the pre-launch audience building approach describes how to collect subscribers before opening. Even 100 subscribers gives you day-one sales potential.
29. Send your launch announcement. Email your subscriber list. Post on every social channel. Tell friends, family, and anyone who supported the building process. The first week’s sales come primarily from your existing network, not strangers.
30. Monitor and respond. Watch for orders, support inquiries, and analytics data in the first 48 hours. Respond to every customer message within 2 hours. Your first 10 customers form the foundation of your review and social proof strategy. Their experience determines whether they become advocates or critics.
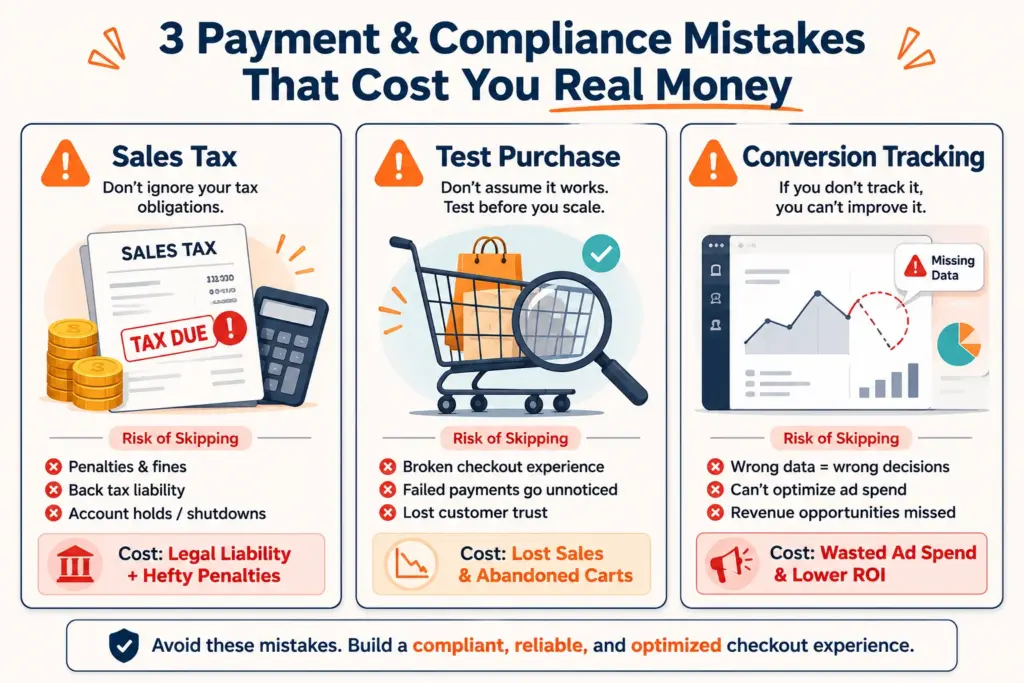
The 3 Steps Most New Stores Skip
Sales tax configuration. 40%+ of new stores launch without proper sales tax collection. This creates accumulating liability that compounds monthly. Every state with economic nexus laws (almost all of them) expects you to collect and remit. Retroactive compliance costs 2 to 5x more than proactive setup.
Real test purchase. Founders assume checkout works because the platform “just handles it.” Configuration errors in shipping rates, tax calculation, payment processing, and inventory tracking only surface during an actual transaction. A 5-minute test prevents hours of launch-day firefighting.
Conversion tracking setup. Launching ads without tracking is spending money without knowing what it produces. According to Google’s measurement best practices, accurate conversion tracking improves campaign ROAS 15 to 30% because the algorithms optimize toward real purchase signals rather than proxy metrics. The tracking implementation should be verified before any paid traffic starts flowing.
Frequently Asked Questions
A basic store can be configured in 1 to 2 weeks working part-time. The technical setup (platform, theme, payments, shipping) takes 2 to 3 days. Product pages (photos, descriptions, pricing) take 3 to 7 days depending on catalog size. Legal pages, testing, and analytics take 1 to 2 days. The most time-consuming element is usually product photography and description writing, not the technical configuration.
Minimum requirements: business registration (LLC recommended), business bank account, domain name, ecommerce platform subscription, product inventory or supplier relationship, product photos (5+ per product), written product descriptions, configured payment processing, shipping rates, sales tax collection, legal pages (privacy, terms, shipping, returns), GA4 analytics, and a completed test purchase. Skip any of these and you’ll fix it reactively under pressure rather than proactively.
Shopify for most first-time sellers: fastest setup, least technical maintenance, built-in payments and shipping, and the largest app ecosystem. WooCommerce for sellers with WordPress experience who want full code-level control and lower monthly costs (free software + $10 to $30/month hosting). Shopify’s simplicity lets you focus on products and marketing instead of server management and plugin conflicts. Both support all major payment methods and shipping carriers.
Legally, no. You can sell as a sole proprietor. Practically, an LLC is strongly recommended because it separates personal assets from business liability. If a customer sues or a product causes harm, an LLC protects your personal savings, home, and other assets. Formation costs $50 to $500 depending on state. The legal protection and professional credibility are worth the minimal cost for any business that plans to operate beyond a casual side project.
A complete real purchase through checkout. Use a real payment method, real shipping address, and verify every step: order confirmation email received, correct amount charged, shipping label generates correctly, inventory count decreases, and the order appears in your admin. Test on both desktop and mobile. This 5-minute test catches more launch-day problems than any other single action. Refund yourself after testing.
First-week sales come from your existing network: email subscribers, social media followers, friends, family, and professional contacts. Send a launch email to your subscriber list, post on every social channel, and personally message people who expressed interest during your building phase. Beyond your network, the fastest path to stranger sales is targeted paid ads ($50 to $100/day on Meta or Google Shopping) with conversion tracking properly configured.
Related Reads
- The Complete Guide to Starting
- Budgeting Your Launch Costs
- Picking the Right Platform
- Building an Audience Before Launch
- Setting Up Analytics From Day One
- Your First Email Marketing Flows
Enjoying this? Get more like it every week.
One email per week with ecommerce strategies, tool picks, and seller insights. No spam.