- GA4 (Google Analytics 4) is free and essential for every ecommerce store. It tracks the entire customer journey from first visit through purchase, showing you which traffic sources generate revenue, which products convert best, and where shoppers drop off in the buying process.
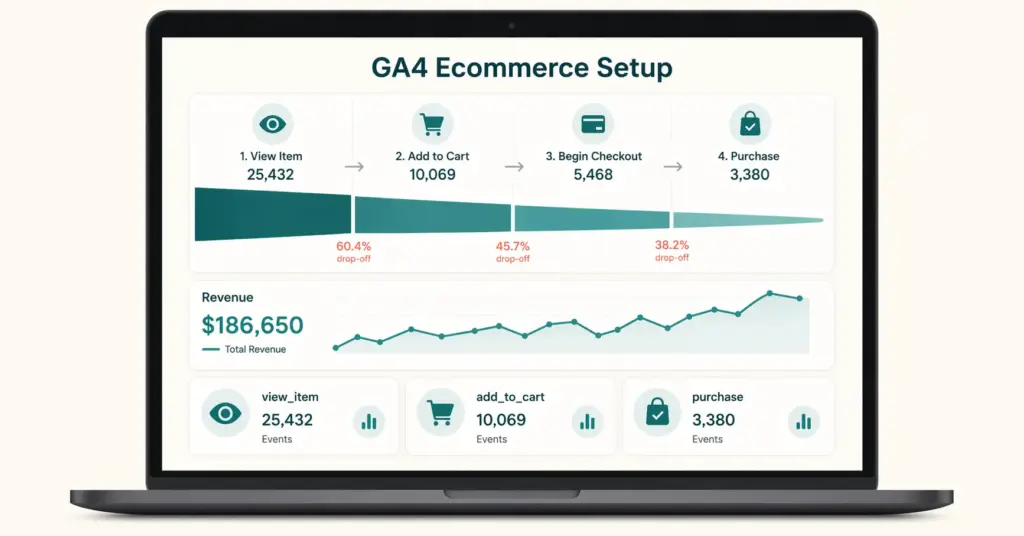
- GA4 ecommerce tracking requires specific events to fire at each stage: view_item, add_to_cart, begin_checkout, add_payment_info, and purchase. Most ecommerce platforms (Shopify, WooCommerce, BigCommerce) have native GA4 integrations or plugins that send these events automatically.
- The three reports every store owner should check weekly: Traffic Acquisition (which channels bring buyers), Ecommerce Purchases (which products sell and at what conversion rate), and Checkout Journey (where shoppers abandon the funnel).
- Connect GA4 to Google Ads for conversion-based bidding and to Google Search Console for organic search data. These two connections transform GA4 from a reporting tool into a decision-making engine.
GA4 ecommerce setup is the process of installing Google Analytics 4 on your online store and configuring it to track ecommerce-specific events like product views, add-to-cart actions, checkout steps, and completed purchases, giving you a complete picture of how visitors move through your store and where revenue comes from. Without this tracking, you’re making marketing and merchandising decisions based on gut feeling instead of data.
GA4 replaced Universal Analytics in July 2023, and the transition confused many store owners. The event-based data model works differently from the old pageview-based system. But once configured correctly, GA4 provides more detailed ecommerce insights than Universal Analytics ever did, including cross-device tracking, predictive audiences, and deeper integration with Google’s advertising ecosystem.
This guide walks through the complete setup from installation to your first useful report. If you’re still building your store, our store launch checklist includes GA4 setup as a pre-launch requirement. For the broader analytics picture, our tools guide covers the full analytics stack.
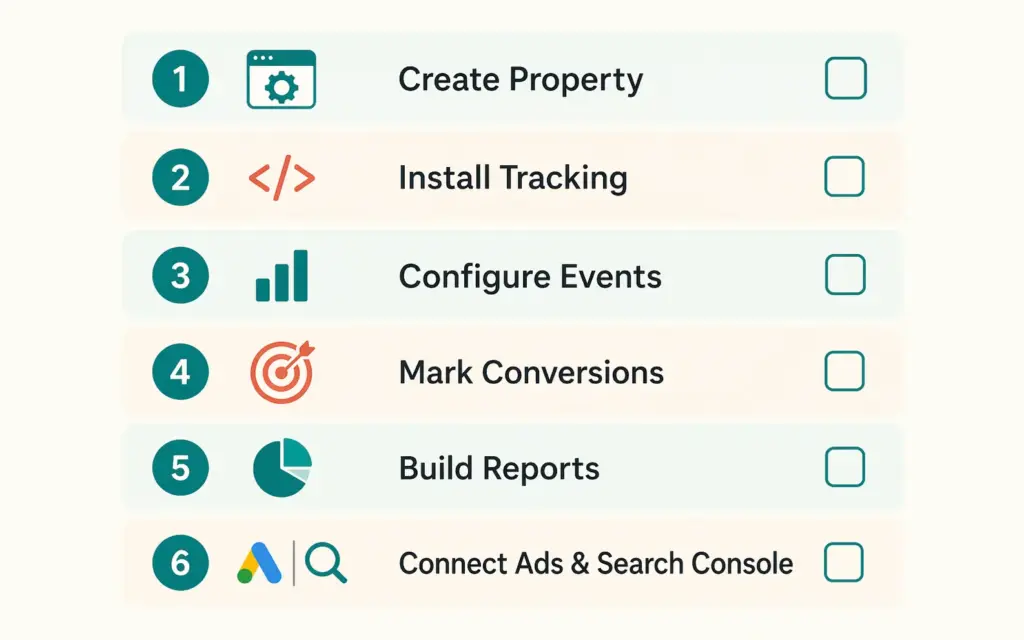
Step 1: Create Your GA4 Property
Go to analytics.google.com and sign in with your Google account. Click Admin (gear icon) then Create Property. Enter your store name, select your time zone and currency, and choose “Online retail” as your industry category.
GA4 creates a Measurement ID (format: G-XXXXXXXXXX). This ID connects your store to your GA4 property. Keep it handy for the next step.
Important setting: under Data Collection, enable Google Signals. This allows cross-device tracking so you can see when someone browses on their phone and purchases on their laptop. Also enable Enhanced Measurement, which automatically tracks scrolls, outbound clicks, site search, video engagement, and file downloads without any code.
Step 2: Install GA4 on Your Ecommerce Platform
Installation varies by platform. Here’s the process for the major ones:
Shopify
Go to Online Store > Preferences > Google Analytics. Paste your G-XXXXXXXXXX Measurement ID. Shopify’s native integration automatically sends basic ecommerce events (page_view, purchase) but misses mid-funnel events. For complete ga4 ecommerce tracking, install the free Google & YouTube Channel app which handles the full event set including view_item, add_to_cart, begin_checkout, and purchase with proper product parameters.
WooCommerce
Install the free “Google for WooCommerce” plugin or use a dedicated GA4 plugin like MonsterInsights or Analytify. The Google for WooCommerce plugin is the official integration that sends all ecommerce events automatically. After activation, connect your Google account and select your GA4 property. The plugin handles all event tracking without custom code.
BigCommerce
BigCommerce has a native GA4 integration under Settings > Analytics > Google Analytics. Enter your Measurement ID and enable Enhanced Ecommerce. BigCommerce sends the full ecommerce event set natively, which is one of its advantages over platforms that need apps for complete tracking.
Manual Installation (Any Platform)
If your platform doesn’t have a native integration, add the GA4 Global Site Tag to your site’s <head> section, then implement ecommerce events using Google Tag Manager (GTM). GTM sits between your website and GA4, firing events based on triggers you configure. This approach requires some technical knowledge but works on any website.
Step 3: Configure Ecommerce Events
GA4 enhanced ecommerce tracking relies on specific events firing at each stage of the shopping journey. Here are the events your store must send:
| Event Name | When It Fires | Key Parameters | Why It Matters |
|---|---|---|---|
| view_item | Visitor views a product page | item_id, item_name, price, currency | Tracks product interest and browsing behavior |
| add_to_cart | Visitor adds product to cart | item_id, item_name, price, quantity | Measures purchase intent |
| remove_from_cart | Visitor removes product from cart | item_id, item_name, price | Identifies rejected products |
| view_cart | Visitor opens cart page | items array, cart value | Tracks cart review behavior |
| begin_checkout | Visitor starts checkout | items array, total value | Measures checkout entry rate |
| add_payment_info | Visitor enters payment details | payment_type, value | Tracks payment step completion |
| add_shipping_info | Visitor selects shipping method | shipping_tier, value | Identifies shipping friction |
| purchase | Order completed | transaction_id, value, items, tax, shipping | Revenue tracking and attribution |
If you’re using a native platform integration (Shopify’s Google app, WooCommerce’s Google plugin, BigCommerce’s built-in), these events are sent automatically. Verify they’re firing correctly using GA4’s DebugView (Admin > DebugView) or the Google Analytics Debugger Chrome extension.
Step 4: Mark Key Events as Conversions
GA4 doesn’t automatically treat purchase events as conversions. You need to mark them. Go to Admin > Events, find the “purchase” event, and toggle “Mark as key event” on. Also mark “add_to_cart” and “begin_checkout” as key events to track micro-conversions through the funnel.
These key event markers tell GA4 (and connected Google Ads) which actions represent business value. When you run Google Ads campaigns, marking “purchase” as a key event enables conversion-based bidding strategies (Target ROAS, Maximize Conversions) that optimize ad spend toward actual revenue.
Step 5: Build Your Ecommerce Reports
Once events are flowing (allow 24-48 hours for data to appear), set up these three essential reports:
Report 1: Traffic Acquisition by Revenue
Reports > Acquisition > Traffic Acquisition. This shows which channels (organic search, paid ads, social media, direct, email) bring visitors AND which ones generate revenue. A channel might drive 40% of your traffic but only 10% of revenue. This report tells you where to invest more and where to cut.
Report 2: Ecommerce Purchases
Reports > Monetization > Ecommerce Purchases. This shows every product sold with quantity, revenue, and purchase-to-view rate (what percentage of people who viewed the product actually bought it). Products with high views but low purchase rate need better pages, pricing, or trust signals. Products with high purchase rate deserve more traffic. This connects directly to product page optimization.
Report 3: Checkout Journey
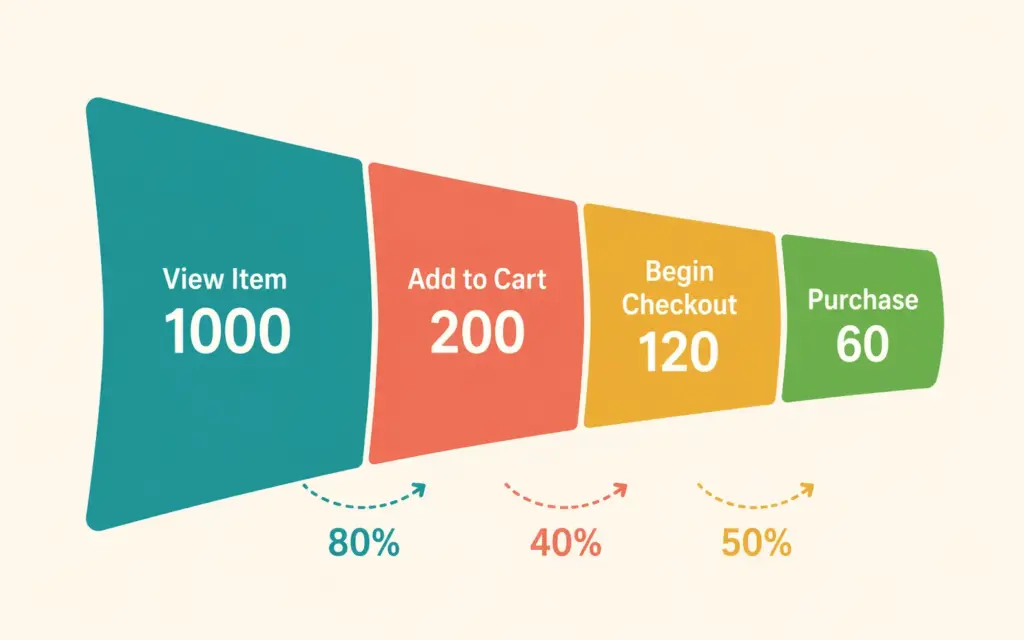
Explore > Funnel Exploration. Build a funnel with these steps: view_item → add_to_cart → begin_checkout → purchase. This visualization shows exactly where shoppers drop off. If 1,000 people view products but only 50 add to cart, your product pages need work. If 200 add to cart but only 30 begin checkout, your cart experience has friction. If 30 begin checkout but only 15 purchase, your checkout flow is leaking sales.
Check these three reports weekly. They tell you everything you need to know about what’s working and what needs fixing in your store.
Step 6: Connect GA4 to Google Ads and Search Console
Google Ads Connection
Admin > Product Links > Google Ads. Link your GA4 property to your Google Ads account. This enables: importing GA4 conversions into Google Ads for smarter bidding, creating remarketing audiences based on GA4 behavior data, and seeing Google Ads cost data alongside GA4 revenue data for true ROAS calculation.
Without this connection, Google Ads optimizes in the dark. With it, the algorithm knows which clicks generate revenue and bids accordingly. This single connection often improves ROAS 20-40% within the first month.
Google Search Console Connection
Admin > Product Links > Search Console. This imports organic search data (queries, impressions, clicks, average position) directly into GA4. You can see which search queries drive traffic and, more importantly, which ones drive revenue. Our SEO guide covers how to use this data for keyword optimization.
Common GA4 Ecommerce Setup Mistakes
Not verifying events are firing. Installing the tracking code isn’t enough. Use DebugView to confirm each event (view_item, add_to_cart, begin_checkout, purchase) actually fires with correct parameters. Missing events mean missing data, and you won’t notice until you wonder why your reports show zero revenue.
Forgetting to mark purchase as a key event. GA4 tracks the purchase event by default but doesn’t treat it as a conversion until you explicitly mark it. Without this, Google Ads can’t optimize for purchases, and your conversion reports show nothing.
Duplicate tracking. Installing GA4 through your platform’s native integration AND through Google Tag Manager sends every event twice, doubling your reported data. Use one method or the other, never both.
Not filtering internal traffic. Your own visits to your store inflate traffic numbers and skew conversion rates. In Admin > Data Streams > your stream > Configure Tag Settings > Define Internal Traffic, add your IP address to exclude your visits from reporting.
Ignoring data retention settings. GA4 defaults to 2-month event data retention for free accounts. Go to Admin > Data Settings > Data Retention and set it to 14 months (the maximum for free GA4). Without this change, your Explore reports can only look back 2 months. Standard reports aren’t affected but custom explorations are.
Setting up without a measurement plan. Before configuring anything, define what business questions GA4 needs to answer. “Which traffic sources generate the most revenue?” “Which products have the highest and lowest conversion rates?” “Where do shoppers abandon checkout?” These questions determine which reports you build and which events you prioritize. Your pricing and retention strategies should be informed by the data GA4 provides.
Frequently Asked Questions
Install the free Google & YouTube Channel app from the Shopify App Store, connect your Google account, and select your GA4 property. The app automatically sends all ecommerce events (view_item, add_to_cart, begin_checkout, purchase) with correct product parameters. Verify events are firing using GA4’s DebugView within 24 hours of installation.
GA4 enhanced ecommerce is the set of specific events that track the shopping journey: product views, add-to-cart actions, checkout steps, and completed purchases. Each event includes product parameters (name, price, quantity, category) that enable detailed revenue reporting, funnel analysis, and product performance comparisons. It replaces Universal Analytics’ Enhanced Ecommerce plugin.
Basic setup (creating the property and installing tracking via a platform integration) takes 15-30 minutes. Verifying events, marking conversions, connecting Google Ads and Search Console, and building initial reports takes another 1-2 hours. Data starts appearing within 24-48 hours. A complete setup with custom funnel reports and filtered views can be done in a single afternoon.
Yes. GA4 is completely free for all ecommerce stores regardless of traffic volume. The free version includes all ecommerce events, conversion tracking, funnel analysis, audience building, and Google Ads integration. Google Analytics 360 (paid version, $50,000+/year) adds higher data limits and advanced features that only enterprise-level stores need.
Three reports weekly: Traffic Acquisition by Revenue (which channels bring paying customers), Ecommerce Purchases (which products convert best and worst), and a custom Checkout Funnel (where shoppers drop off between add-to-cart and purchase). These three reports cover acquisition efficiency, product performance, and conversion friction, the three areas that drive revenue decisions.
In GA4 Admin, go to Product Links and select Google Ads. Link your Ads account, then import your GA4 purchase key event as a conversion in Google Ads. This enables conversion-based bidding (Target ROAS, Maximize Conversions) that optimizes ad spend toward actual revenue. The connection typically improves ROAS 20-40% within the first month by giving the algorithm real purchase data.
Related Reads
- Ecommerce Tools and Tech Stack
- Ecommerce SEO Complete Guide
- Technical SEO Audit Checklist
- Product Page Design Guide
- Store Launch Checklist
- Best Ecommerce Platform Comparison
Enjoying this? Get more like it every week.
One email per week with ecommerce strategies, tool picks, and seller insights. No spam.