- You can create a Shopify store and make your first sale within 7 days. Shopify offers a 3-day free trial followed by $1/month for the first 3 months, making the total cost to test the platform just $3 for three full months of selling.
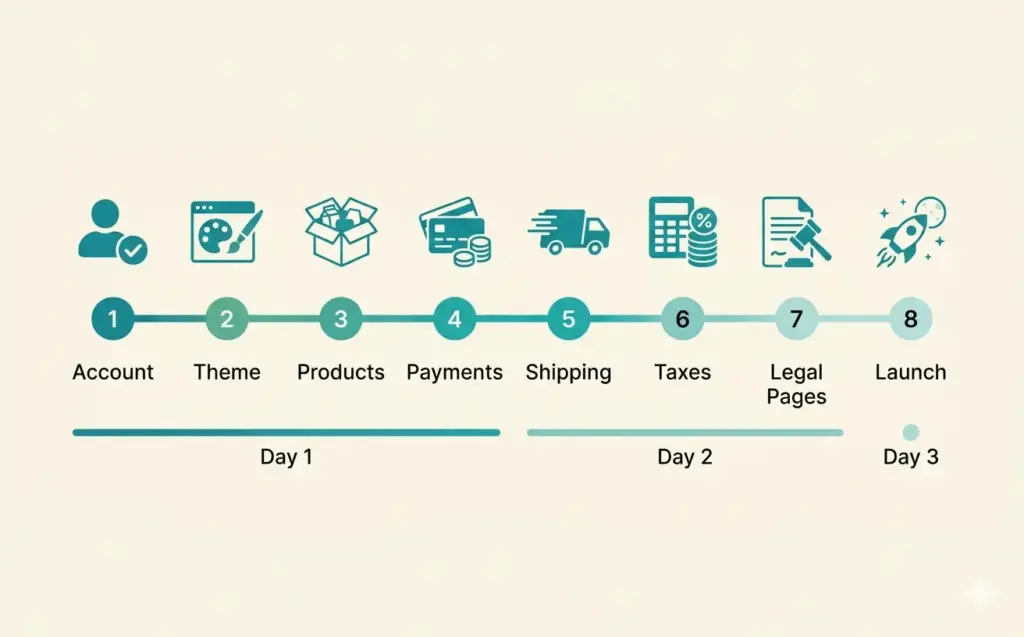
- The setup process has 8 steps: create your account, choose a theme, add products, configure payments, set shipping rates, set up taxes, add legal pages, and launch. Most beginners complete setup in 1-3 days.
- You don't need inventory to start selling on Shopify. Dropshipping, print on demand, and digital products all work on the platform without holding any stock. Shopify connects with 8,000+ apps covering every business model.
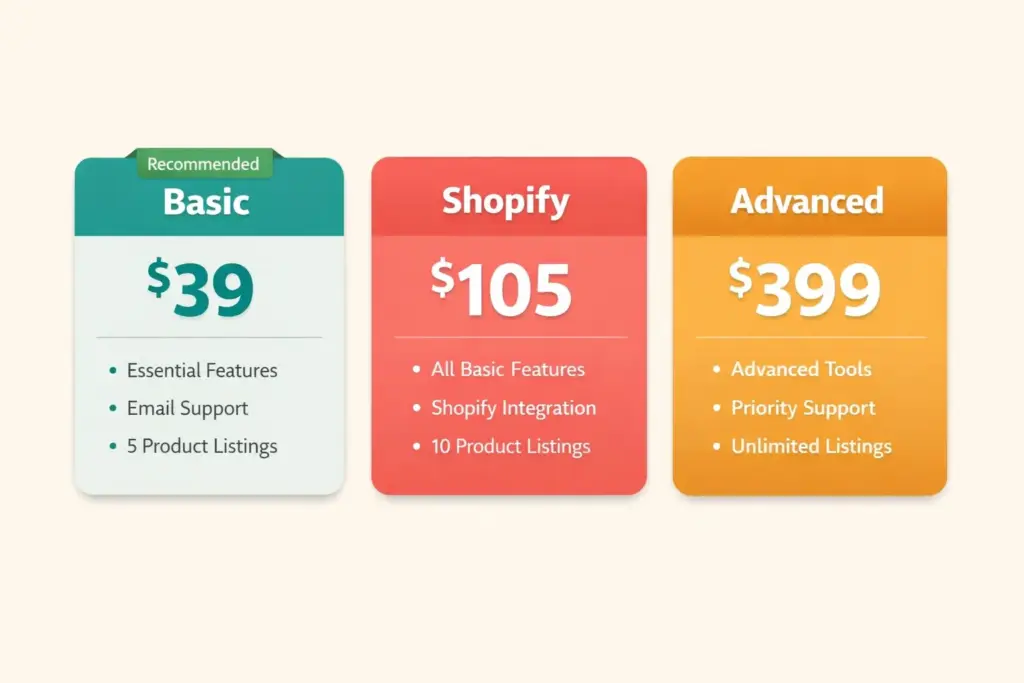
- The Basic plan at $39/month (after the trial period) includes everything most new stores need: unlimited products, 2 staff accounts, up to 1,000 inventory locations, and built-in shipping discounts with USPS, UPS, and DHL.
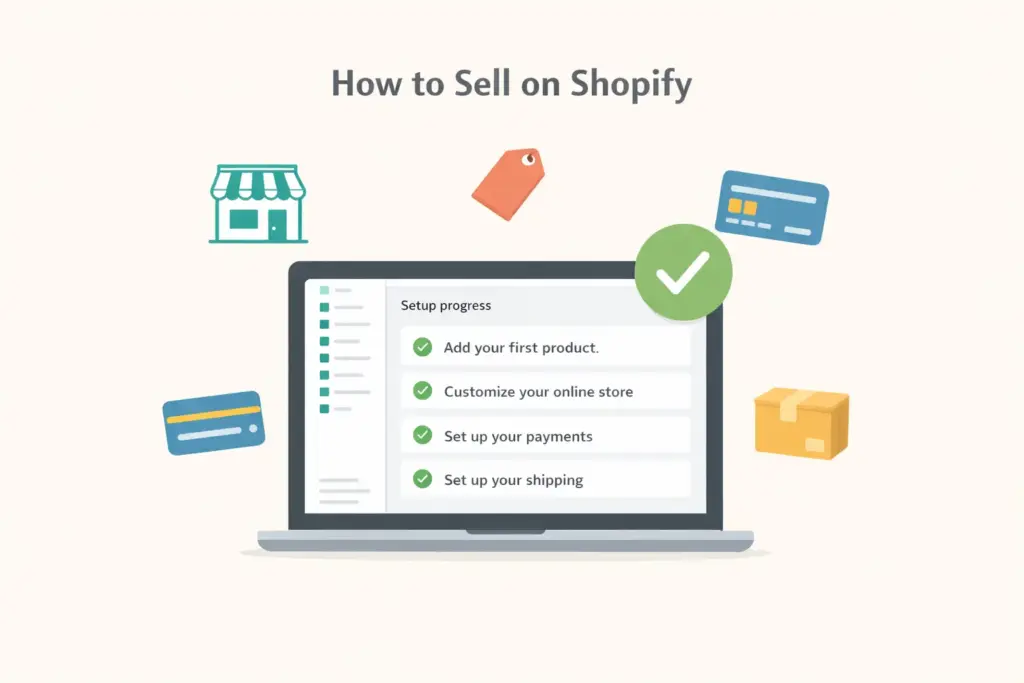
How to sell on Shopify starts with creating a free trial account, choosing a store theme, adding your products, configuring payments and shipping, and removing the password page to go live. The entire setup takes most beginners 1-3 days, and Shopify’s guided onboarding walks you through each step with checklists and tutorials built directly into the admin dashboard.
Shopify powers over 4.8 million live online stores worldwide, making it the most popular hosted ecommerce platform. Its strength is accessibility: you don’t need technical skills, design experience, or coding knowledge to launch a professional-looking store. If you can navigate a smartphone, you can build a Shopify store.
This guide walks through every setup step with the decisions you need to make at each stage. If you’re still deciding whether Shopify is the right platform, our ecommerce platform comparison covers how it stacks up against BigCommerce, WooCommerce, and others. If you’ve already decided on Shopify, keep reading.
Step 1: Create Your Shopify Store Account
Go to Shopify’s free trial page and enter your email address. Shopify asks a few questions about your business (what you’re selling, your current revenue) to customize your setup experience. These answers don’t lock you into anything.
You’ll get a 3-day free trial with full access to every feature. After that, Shopify offers $1/month for the first 3 months on any plan. That’s $3 total to create a shopify store and test it with real products and real customers for a full quarter. No credit card required for the trial.
During signup, Shopify generates a temporary URL (yourstore.myshopify.com). You’ll connect a custom domain later. Don’t worry about the store name being perfect. You can change it anytime in Settings.
Step 2: Choose and Customize Your Theme
Your theme determines how your store looks. Shopify offers 13 free themes and 200+ paid themes ($150-400 one-time). For most new stores, the free Dawn theme is the best starting point. It’s fast, mobile-optimized, and designed by Shopify’s own team.
To build a shopify website that looks professional without a designer:
- Pick a theme that matches your product type (Dawn for general, Sense for wellness/beauty, Craft for handmade goods)
- Upload your logo and set brand colors in the theme editor
- Customize the homepage sections: hero banner, featured collection, testimonials, about section
- Test on mobile by using Shopify’s built-in preview toggle
Don’t spend more than a day on design. Your theme can be refined after launch. Getting products listed and the store functional matters more than pixel-perfect design in week one. Our ecommerce web design guide covers deeper design optimization once your store is generating traffic.
Step 3: Add Your Products
In Shopify admin, go to Products > Add Product. Each product listing needs:
Product title. Clear, descriptive, keyword-rich. “Organic Cotton Crew Neck T-Shirt – Unisex” is better than “Basic Tee #1.”
Product description. Write for the buyer, not search engines. Lead with benefits, include specs, address common questions. 150-300 words per product is the sweet spot. Never copy manufacturer descriptions that other stores also use.
Product images. Multiple angles, lifestyle shots, and detail images. Use high-quality photos on white backgrounds for the main image. Shopify supports up to 250 images per product.
Pricing. Set your retail price and compare-at price (if showing a discount). Understand your full cost structure including product cost, shipping, Shopify fees (2.9% + $0.30 per transaction on Basic), and marketing costs before setting prices. Our pricing strategy guide covers margin calculations in detail.
Variants. If your product comes in multiple sizes, colors, or options, add variants. Shopify supports up to 100 variants per product with 3 option types (Size, Color, Material, etc.).
Inventory tracking. Enable “Track quantity” and set stock levels. Shopify automatically marks products as “Sold out” when inventory hits zero.
No Products Yet? Start Without Inventory
You don’t need physical inventory to start a Shopify business. Three models let you sell without holding stock:
- Dropshipping: Install DSers or Spocket, import products from suppliers, and they ship directly to your customers
- Print on demand: Connect Printful or Printify, upload your designs, they produce and ship per order
- Digital products: Sell ebooks, templates, courses, and downloads with zero fulfillment
Step 4: Configure Payments
Go to Settings > Payments. Shopify Payments (powered by Stripe) is the default and best option for most stores. It eliminates the extra 2% transaction fee Shopify charges when using third-party payment processors.
Shopify Payments processing rates by plan:
| Plan | Online Rate | In-Person Rate |
|---|---|---|
| Basic ($39/mo) | 2.9% + $0.30 | 2.6% + $0.10 |
| Shopify ($105/mo) | 2.7% + $0.30 | 2.5% + $0.10 |
| Advanced ($399/mo) | 2.5% + $0.30 | 2.4% + $0.10 |
Enable additional payment methods: PayPal (connects in one click), Shop Pay (accelerated checkout for returning customers), Apple Pay, and Google Pay. More payment options mean fewer abandoned checkouts. Our payment gateway guide covers the full setup for each processor.
Step 5: Set Up Shipping
Go to Settings > Shipping and delivery. Shopify offers three shipping rate approaches:
Free shipping (above a threshold). “Free shipping on orders over $50” is the most conversion-friendly option. Build shipping cost into your product pricing. This is the approach most successful Shopify stores use.
Flat rate shipping. A fixed amount regardless of order size ($5.99 flat rate, for example). Simple for customers to understand and easy for you to manage.
Calculated rates. Real-time rates from USPS, UPS, or DHL based on package weight and destination. Most accurate but can surprise customers at checkout with higher-than-expected shipping costs.
Shopify includes discounted shipping rates with USPS, UPS, and DHL on all plans. You can buy and print shipping labels directly from the Shopify admin. For stores processing 50+ orders daily, apps like ShipStation add batch processing and multi-carrier optimization.
Step 6: Set Up Taxes
Go to Settings > Taxes and duties. Shopify automatically calculates sales tax for US states based on your store location and the customer’s shipping address. Enable automatic tax calculation and verify the rates are correct for your state.
If you sell internationally, Shopify handles VAT/GST calculations for major markets. For complex tax situations (multiple nexus states, specific product tax exemptions), consider integrating with Avalara or TaxJar. Most new stores can rely on Shopify’s built-in tax engine without additional tools.
Step 7: Add Legal Pages and Essential Content
Before going live, your store needs these pages:
- Privacy Policy: Shopify generates a template in Settings > Policies. Customize it with your store’s specific data practices.
- Terms of Service: Also available as a Shopify template. Covers your relationship with buyers.
- Refund Policy: Be clear about return windows, conditions, and refund methods. Ambiguous return policies kill buyer confidence.
- Shipping Policy: Estimated delivery times, carriers used, and international availability.
- About Page: Your brand story. People buy from brands they connect with. Even a few paragraphs about why you started helps.
- Contact Page: Email address and/or contact form at minimum. Response time expectations build trust.
These pages aren’t optional. Beyond legal requirements, they’re trust signals that directly impact whether a first-time visitor completes a purchase. Check our store launch checklist for the complete pre-launch verification process.
Step 8: Launch Your Store
Before removing the password page:
- Place a test order using Shopify’s Bogus Gateway (Settings > Payments > test mode) to verify checkout works end-to-end
- Check all pages on mobile using a real phone, not just the desktop preview
- Verify email notifications (order confirmation, shipping confirmation) send correctly
- Connect your custom domain ($14/year through Shopify or use an existing domain from any registrar)
- Set up Google Analytics 4 and submit your sitemap through Google Search Console
When everything checks out: Online Store > Preferences > disable password protection. Your store is now live. The next step is getting traffic through the strategies covered in our marketing guides.
How to Use Shopify to Make Money: Revenue Strategies
Setting up the store is the easy part. Making money requires a strategy. Here’s what works for new Shopify stores:
Start with organic social media. Create TikTok and Instagram Reels showing your products in use. This is free and can generate your first sales within weeks. Product demonstrations, unboxing videos, and before-after content perform best.
Set up email capture immediately. Install a pop-up offering 10-15% off the first order in exchange for an email address. Use Shopify Email (free for 10,000 emails/month) or Klaviyo to send welcome series and abandoned cart recovery emails.
Run a small paid ad test. Once you know which products get organic engagement, invest $50-100 in Facebook or Instagram ads targeting similar audiences. The goal is data, not immediate profit. Learn your cost per click and conversion rate.
Focus on repeat customers. Your second sale to an existing customer is far more profitable than your first sale to a new one because you’ve already paid to acquire them. Post-purchase email sequences and loyalty programs covered in our retention guide are critical from month two onward.
Shopify Plans and Pricing
| Plan | Monthly Price | Best For | Key Differences |
|---|---|---|---|
| Basic | $39/mo | New stores, testing | 2 staff accounts, basic reports |
| Shopify | $105/mo | Growing stores | 5 staff, professional reports, lower card rates |
| Advanced | $399/mo | Scaling stores | 15 staff, advanced reports, lowest card rates |
Start on Basic. Upgrade when your monthly revenue consistently exceeds $10,000 and the lower transaction fees on higher plans save you more than the price difference. Understanding your full startup costs helps you budget properly beyond just the platform fee.
Frequently Asked Questions
Start with Shopify’s free trial, choose the free Dawn theme, add 5-10 products with clear photos and descriptions, configure Shopify Payments, set shipping rates, add legal pages, and remove the password page to go live. The entire process takes 1-3 days. Shopify’s admin dashboard includes a setup checklist that guides you through each step.
Shopify’s trial costs $0 for 3 days, then $1/month for 3 months ($3 total). After that, the Basic plan is $39/month. Add a custom domain ($14/year) and payment processing (2.9% + $0.30 per sale). Total first-year cost for a basic store: approximately $500-600 including the platform, domain, and a few essential apps.
Use dropshipping (DSers app imports products from suppliers who ship directly to customers), print on demand (Printful creates custom products per order), or sell digital products (ebooks, templates, courses). All three models work on Shopify without holding inventory. Dropshipping is the most popular zero-inventory model for beginners.
Build your store, drive traffic through organic social media (TikTok and Instagram Reels), capture emails with a first-order discount, set up abandoned cart recovery, and reinvest first profits into small ad tests. Focus on repeat customers after your first 50 sales. Stores that combine organic content with email marketing and one paid channel typically reach profitability fastest.
Start with a free Shopify theme like Dawn, upload a clean logo, set consistent brand colors, use high-quality product photography, and fill out your About and policy pages. Professional design comes from consistency and quality images, not expensive themes. Spend time on product photos rather than theme customization for the biggest visual impact.
Shopify offers a 3-day free trial with full functionality. After that, the introductory rate is $1/month for 3 months. There’s no permanently free plan. However, $3 for three months of a fully functional store with unlimited products makes Shopify one of the cheapest platforms to test. You can build and launch your entire store during the trial period.
Related Reads
- Best Ecommerce Platform Comparison
- Best Shopify Apps Guide
- BigCommerce SEO Review
- Ecommerce Tools and Tech Stack
- How to Start an Ecommerce Business
- Ecommerce Storefront Launch Checklist
Enjoying this? Get more like it every week.
One email per week with ecommerce strategies, tool picks, and seller insights. No spam.