
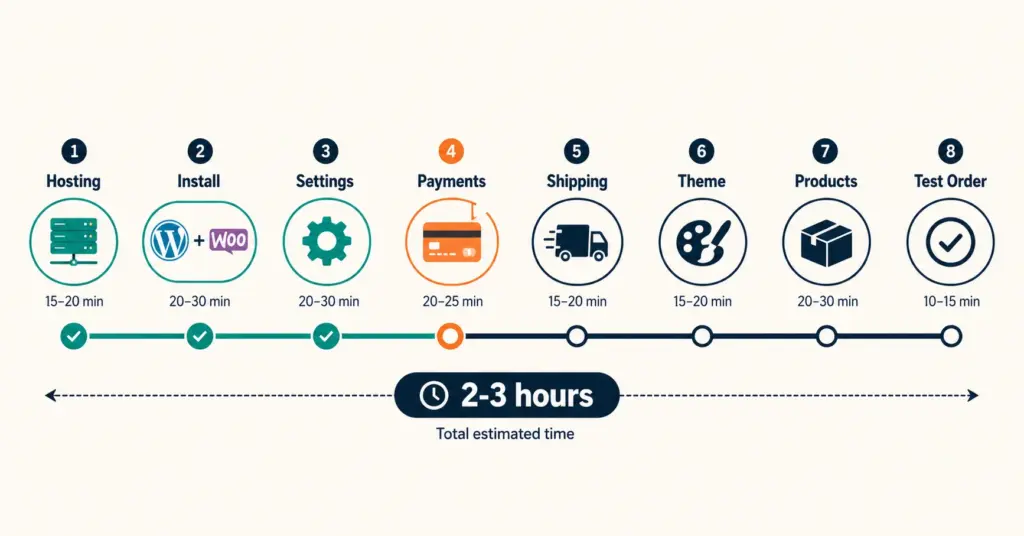
- WooCommerce is a free WordPress plugin that turns any WordPress site into a full ecommerce store. It powers over 36% of all online stores worldwide (6.6+ million active installations), making it the most widely used ecommerce platform by install count. The software is free. You pay for hosting ($5 to $30/month), a domain ($14/year), and optional premium plugins.
- The setup takes 2 to 3 focused hours for a basic store: choose hosting (15 minutes), install WordPress + WooCommerce (20 minutes), configure settings (30 minutes), set up payments and shipping (30 minutes), add products (varies by catalog size), install essential plugins (15 minutes), and test with a real order (15 minutes).
- Hosting choice determines your store's speed, uptime, and scalability. WooCommerce-optimized hosts (SiteGround, Cloudways, Kinsta) handle caching, PHP version management, and server configuration that generic shared hosting does not. A $10/month WooCommerce host outperforms a $3/month generic shared host on every metric that affects conversion.
- The most common WooCommerce setup mistake: installing 20 plugins before configuring the basics. Each plugin adds page load time and potential conflicts. Install WooCommerce, configure payments, shipping, and taxes, add 5 products, place a test order, THEN add plugins one at a time as specific needs arise.
WooCommerce setup is straightforward when you follow the steps in the right order. Most tutorials jump between hosting recommendations, plugin lists, and theme showcases without giving you a clear sequence. This guide gives you that sequence: hosting first, installation second, settings third, payments and shipping fourth, products fifth, testing sixth, launch last. Skip a step or do them out of order and you’ll spend twice as long fixing things that should have been configured upfront.
WooCommerce powers over 36% of all online stores worldwide, with 6.6 million active installations. It’s the most flexible ecommerce platform available because it’s open-source and runs on WordPress, which means you control everything: the code, the hosting, the design, and the data. That flexibility is WooCommerce’s strength and its challenge. Shopify makes decisions for you. WooCommerce lets you make every decision yourself. According to AttoWP’s WooCommerce setup analysis, the platform’s historical pain points around performance and customization have been addressed in WooCommerce 9.x with block-based checkout, High-Performance Order Storage (HPOS), and Full Site Editing. The Shopify vs WooCommerce comparison covers when WooCommerce is the right choice versus Shopify.
Step 1: Choose WooCommerce-Optimized Hosting That Won’t Slow You Down
Your hosting provider determines your store’s speed, uptime, and how much server management you have to handle yourself. WooCommerce needs PHP 8.1+, MySQL 8.0+, SSL certificate, and server-level caching to perform well. Generic $3/month shared hosting meets the minimum requirements on paper but delivers poor real-world performance: slow page loads, downtime during traffic spikes, and no WooCommerce-specific optimization.
Recommended WooCommerce-optimized hosts:
- SiteGround ($6 to $15/month): WooCommerce-optimized caching, free SSL, automatic updates, staging environments. Best value for new stores.
- Cloudways ($14 to $28/month): Managed cloud hosting on DigitalOcean, AWS, or Google Cloud. Better performance than shared hosting. Good for stores expecting 100+ orders/day.
- Kinsta ($35+/month): Premium managed WordPress hosting on Google Cloud. Fastest performance, automatic daily backups, staging. Best for stores with performance-critical needs.
Install an SSL certificate before doing anything else. Most WooCommerce hosts include free SSL (Let’s Encrypt). Without SSL, browsers display “Not Secure” warnings that stop purchases immediately. The ecommerce tools and tech stack should include hosting as a foundational decision, not an afterthought.
Step 2: Install WordPress and WooCommerce in Under 20 Minutes
Most WooCommerce hosts offer one-click WordPress installation. After WordPress is installed, adding WooCommerce takes 3 steps: go to Plugins > Add New > search “WooCommerce” > click Install > click Activate. WooCommerce’s setup wizard launches automatically and walks you through store details, industry selection, product types, and initial configuration.
During the wizard, enter your store address accurately (it feeds tax and shipping calculations), select your product type (physical, digital, or both), and choose your currency. Skip the optional plugin recommendations in the wizard for now. You’ll add plugins deliberately in a later step, not impulsively during setup.
Step 3: Configure Essential WooCommerce Store Settings First
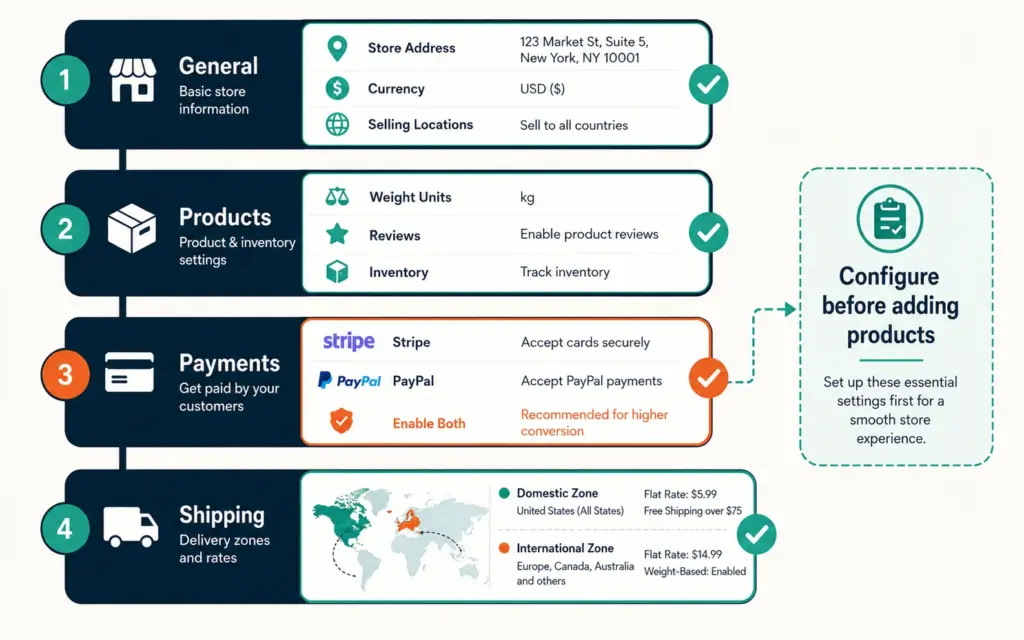
Go to WooCommerce > Settings. Work through each tab in order:
General: Store address, selling locations (where you sell to), currency, and tax calculation settings. Enable “Calculate tax based on: Customer shipping address” for US sales tax compliance.
Products: Weight and dimension units, review settings (enable customer reviews, require verified owner for reviews), and inventory settings (enable stock management, set low-stock threshold for notifications).
Accounts & Privacy: Enable guest checkout (don’t force account creation, it kills conversion). Allow customers to create accounts during checkout if they choose. Set your privacy policy page. The checkout optimization research consistently shows that forced account creation is a top-5 checkout abandonment cause.
Step 4: Set Up Payment Gateways and Shipping Zones
Payment gateways: enable Stripe and PayPal at minimum
WooCommerce > Settings > Payments. Install and activate WooCommerce Stripe Payment Gateway (free plugin). This handles credit cards, debit cards, Apple Pay, and Google Pay through a single integration. Processing rate: 2.9% + $0.30 per transaction. Add WooCommerce PayPal Payments as a secondary option for buyers who prefer PayPal’s buyer protection.
The payment methods guide covers why offering express checkout (Apple Pay, Google Pay) alongside traditional cards lifts mobile conversion 50 to 70%. Stripe enables both through a single plugin. The best WooCommerce plugins list covers payment and functionality plugins ranked by quality.
Shipping zones: configure rates before adding products
WooCommerce > Settings > Shipping. Create zones for your shipping regions (Domestic, International, Local). Add shipping methods to each zone: Flat Rate (simplest), Free Shipping (set a minimum order threshold), or calculated rates via carrier plugins. For most new stores, flat-rate domestic shipping ($5 to $8) plus free shipping above a threshold ($50 to $75) covers the basics. The shipping strategies guide covers carrier selection and rate optimization in depth.
Tax configuration: don’t skip this step
WooCommerce > Settings > Tax. Enable automated tax calculation using WooCommerce Tax (free for basic stores) or connect to TaxJar/Avalara for multi-state compliance. US stores must collect sales tax in nexus states. Skipping this step creates accumulating tax liability. The first store checklist identifies tax configuration as the most commonly skipped step that costs new stores the most.
Step 5: Select a WooCommerce Theme That Prioritizes Speed
Your theme controls how your store looks and significantly affects page load speed. A bloated theme with heavy animations and 50 demo features you’ll never use adds 2 to 3 seconds to every page load. A lightweight, WooCommerce-optimized theme loads in under 2 seconds.
Recommended themes for 2026:
- Astra (free to $59/year): Lightest WooCommerce-compatible theme. Under 50KB size. Extensive customization without code.
- GeneratePress (free to $59/year): Performance-focused, clean code, fast rendering. Popular with speed-conscious store owners.
- Storefront (free): WooCommerce’s official theme, built by the same team. Deepest WooCommerce integration. No compatibility issues by definition.
- Kadence (free to $149/year): Modern block-based theme with header/footer builder and WooCommerce starter templates.
Pick one. Don’t spend a week comparing 30 themes. A free theme with strong product photography outperforms a $200 premium theme with weak photos. Launch with what works. Upgrade later when you have revenue and specific design needs the free theme can’t handle.
Step 6: Add Your First Products With Complete Listing Data
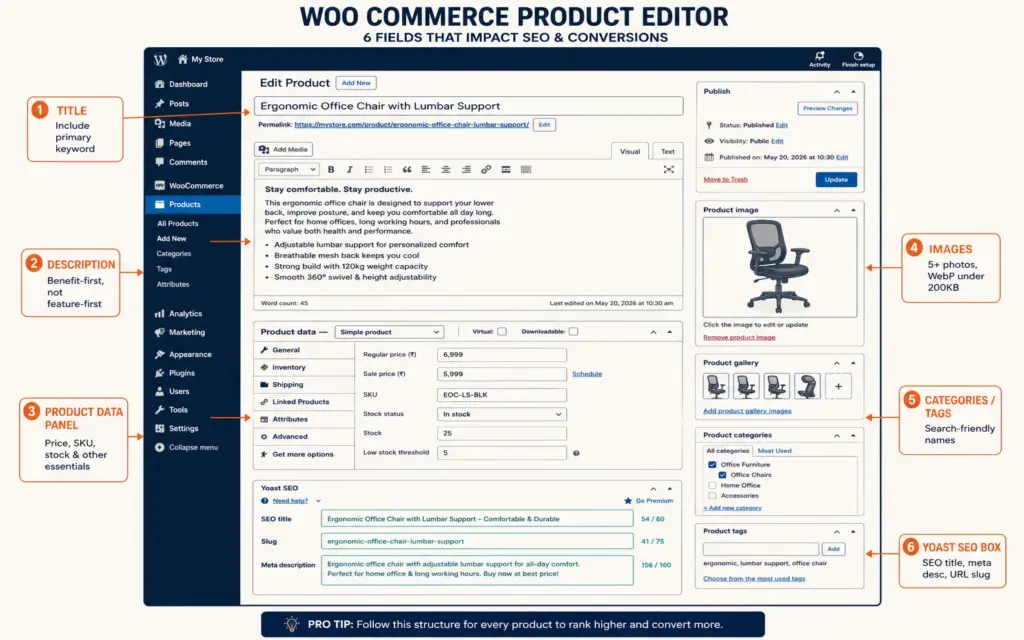
Products > Add New. For each product, fill in every field that applies:
Product title: Include the primary search keyword. “Handmade Ceramic Pour-Over Coffee Set” ranks. “The Artisan” doesn’t. Write for the buyer searching Google, not for your internal catalog naming convention.
Product description: Benefit-first copywriting. What the product does for the buyer, not what it’s made of. Lead with the outcome, follow with the specs. The product descriptions guide covers the structure that converts browsers into buyers.
Product data: Regular price, sale price (if applicable), SKU, stock quantity (enable “Manage stock” and set the quantity), weight and dimensions (feeds shipping calculations), and product categories/tags.
Product images: Upload 5+ images per product. Featured image: product on clean background. Gallery: lifestyle, detail, scale, packaging shots. Compress all images to WebP under 200KB before uploading. The mobile CRO guide covers why image size directly affects mobile conversion through page speed.
SEO fields: Install Yoast SEO or Rank Math (free). Set the SEO title, meta description, and URL slug for each product. Include your primary keyword in all three. According to PluginTheme’s WooCommerce guide, setting up WooCommerce correctly from the beginning saves countless hours of troubleshooting later because a well-configured store loads faster, converts better, and is easier to maintain.
Step 7: Install Only the Essential Plugins at Launch
The WooCommerce plugin ecosystem has thousands of options. Most new stores install too many. Each plugin adds page load time (50 to 200ms), potential security vulnerabilities, and update maintenance. Start with the minimum:
- Yoast SEO or Rank Math (free): On-page SEO optimization, XML sitemaps, and schema markup.
- WooCommerce Stripe Gateway (free): Credit card and express checkout processing.
- UpdraftPlus or similar (free): Automated backups. Non-negotiable. One plugin conflict or hack without a backup means rebuilding from scratch.
- Wordfence or Sucuri (free tier): Security monitoring and firewall. WordPress sites are targeted more frequently than hosted platforms like Shopify.
Add review plugins, email marketing integrations, and advanced functionality after launch when specific needs arise. The email marketing strategy implementation (Klaviyo or Mailchimp for WooCommerce) should be the first post-launch addition because email is the highest-ROI marketing channel for ecommerce.
Step 8: Place a Real Test Order Before Going Live
Enable Stripe’s test mode (WooCommerce > Settings > Payments > Stripe > Test Mode). Place a complete order through your checkout. Verify: order confirmation email sends and looks correct, payment processes without errors, shipping rates calculate accurately, tax applies correctly, inventory count decreases, and the entire checkout works on your phone. Fix anything that breaks. Then test again. This 15-minute step prevents hours of customer-facing problems on launch day.
Frequently Asked Questions
WooCommerce itself is free. Ongoing costs: hosting ($5 to $30/month), domain name ($14/year), SSL certificate (usually free with hosting), and optional premium plugins or themes ($0 to $200/year). Total first-year cost: $100 to $500 for a basic store. Compare to Shopify’s $468/year minimum ($39/month). WooCommerce is cheaper monthly but requires more technical management. The trade-off is cost versus convenience.
2 to 3 focused hours for technical setup (hosting, installation, settings, payments, shipping, theme). Product pages take additional time depending on catalog size: 15 to 30 minutes per product for photos, descriptions, and SEO fields. A store with 10 products can launch in a single day. A store with 100+ products takes 1 to 2 weeks. The technical configuration time is the same regardless of catalog size.
SiteGround ($6 to $15/month) for most new stores: WooCommerce-optimized caching, free SSL, staging environments, and reliable support. Cloudways ($14 to $28/month) for growing stores needing more performance. Kinsta ($35+/month) for premium performance on Google Cloud infrastructure. Avoid generic $3/month shared hosting: it meets minimum requirements but delivers poor real-world speed and reliability that directly reduces conversion rates.
Not for basic setup. WooCommerce’s setup wizard, visual customizer, and block editor handle most configuration without code. You need technical comfort with WordPress (installing plugins, navigating the admin dashboard, configuring settings) but not programming knowledge. Where Shopify has a simpler admin interface, WooCommerce has more settings and options, which means a steeper learning curve but more control. Coding skills become valuable for advanced customization, but launching a functional store requires none.
Four essentials: Yoast SEO or Rank Math (SEO optimization), WooCommerce Stripe Gateway (payment processing), UpdraftPlus (automated backups), and Wordfence (security). That covers SEO, payments, data protection, and security. Add email marketing (Klaviyo or Mailchimp for WooCommerce), reviews, and additional functionality after launch when specific needs arise. Every unnecessary plugin at launch adds page load time and maintenance overhead.
Shopify is easier for most beginners: faster setup, simpler interface, no hosting management, and built-in support. WooCommerce is better for beginners who have WordPress experience, want lower monthly costs, need full code-level customization control, or plan to scale into complex product configurations that Shopify restricts. If speed-to-launch matters most, choose Shopify. If long-term flexibility and cost control matter most, choose WooCommerce.
Related Reads
- Shopify vs WooCommerce
- Best WooCommerce Plugins
- Ecommerce Tools and Tech Stack
- Checkout Optimization
- First Store Checklist
- Payment Methods
Enjoying this? Get more like it every week.
One email per week with ecommerce strategies, tool picks, and seller insights. No spam.