
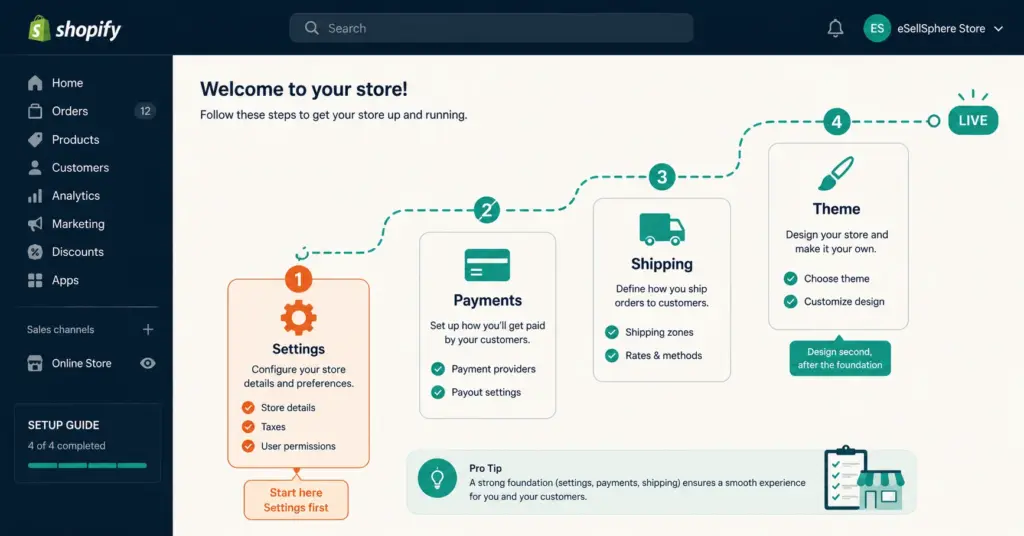
- Setting up a Shopify store takes 1 to 3 days if you follow the steps in order. Most new sellers rush to pick a theme and add products while skipping the settings that actually matter: payment processing, shipping zones, tax collection, and a real test purchase. Those skipped steps cause launch-day problems that take longer to fix than they would have taken to set up.
- Start in Settings, not in the theme editor. Configure payments (activate Shopify Payments for the lowest rates and express checkout access), shipping zones and rates, tax collection, and notification emails before touching design. Settings are the plumbing. Design is the paint. Paint over broken plumbing and you get a beautiful store that can't process orders correctly.
- Shopify's 2026 theme ecosystem includes the Horizon collection (free, AI-integrated, block-based) alongside Dawn (simpler, proven). Free themes are enough to launch. A free theme with strong product photos outperforms a $350 premium theme with weak photos every time.
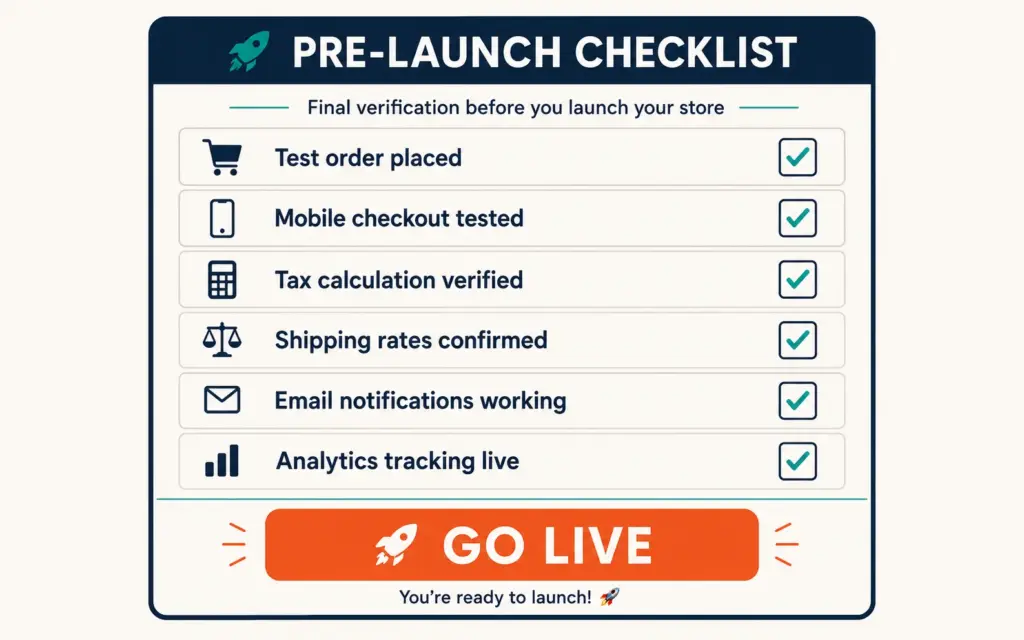
- Place a real test order before going live. Pay with a real card, confirm the order confirmation email arrives, verify shipping rates calculated correctly, check that inventory decremented, and test on your phone. This single step catches more launch problems than anything else you can do.
This Shopify setup guide walks through every step of building a Shopify store, in the order that actually matters. Not the order most tutorials use (pick a pretty theme first, figure out payments later), but the order that prevents launch-day headaches: settings first, design second, products third, testing last.
Shopify powers over 5.6 million active stores and holds roughly 30% of the US ecommerce platform market. The platform handles hosting, security, SSL, PCI compliance, and software updates for you. Your job is configuration: telling Shopify where you’re located, how you want to get paid, what you charge for shipping, and what products you sell. According to Shopify’s own setup tutorial, most new stores can go from blank dashboard to published storefront in a single afternoon if they follow a structured process. The mess happens when sellers skip around.
Step 1: Create Your Account and Set the Foundation
Go to shopify.com, click “Start free trial,” and enter your email. Shopify offers a 3-day free trial followed by the first month at $1. You don’t need a credit card to start the trial. Answer the onboarding questions (what you sell, your experience level) or skip them. Either way, you land in the Shopify admin dashboard.
Before anything else, click “Settings” in the bottom-left corner. This is where every Shopify tutorial should start and few actually do.
Store details
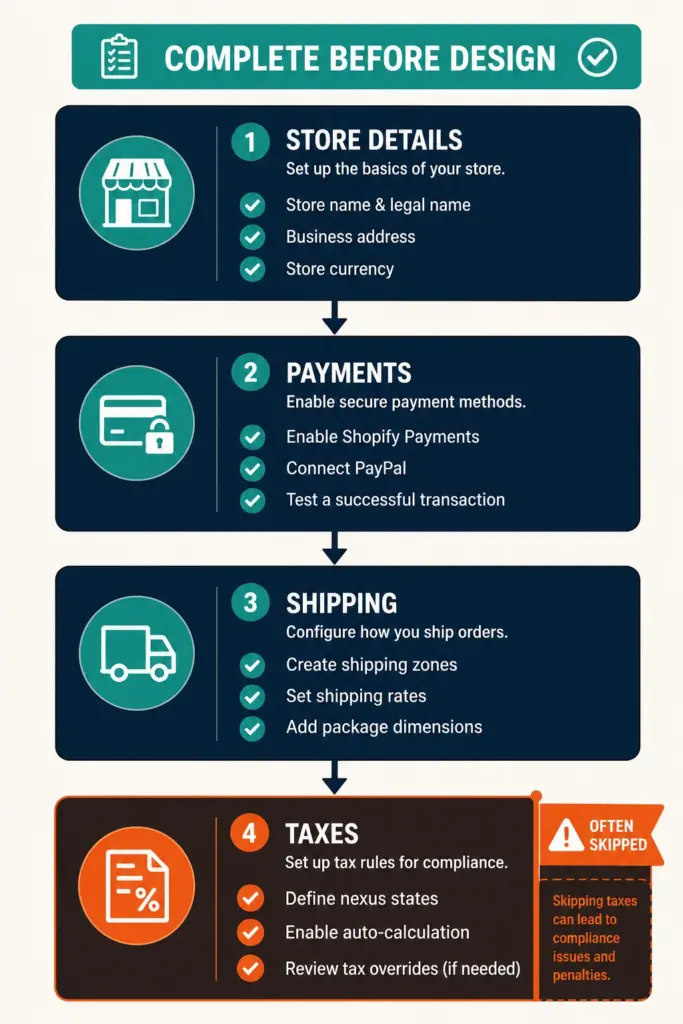
Set your store name, legal business address, and store currency. Your address feeds into shipping calculations and tax settings, so get it right now. Set the currency before adding products. Changing it later on a live store creates pricing headaches. If you’re comparing Shopify against other options, the Shopify vs WooCommerce comparison covers the platform-level tradeoffs.
Plan selection
Shopify Basic ($39/month) covers everything a new store needs: unlimited products, SSL certificate, abandoned cart recovery, and 2 staff accounts. The $105 Shopify plan adds professional reports and lower processing rates. Upgrade later when the reporting limitations actually slow you down, not before. Most stores run on Basic for their first 6 to 12 months.
Step 2: Configure Payments
Settings > Payments. This is the single most important configuration step.
Activate Shopify Payments. It’s Shopify’s built-in payment processor. Credit cards, debit cards, Apple Pay, Google Pay, and Shop Pay all activate when you turn it on. Processing rates: 2.9% + $0.30 on the Basic plan, dropping to 2.4% + $0.30 on the Advanced plan. No additional transaction fee (Shopify charges 0.5 to 2% extra on every sale processed through third-party gateways). Using Shopify Payments also unlocks Shop Pay, which Shopify reports produces 1.7x higher checkout conversion than standard checkout.
Add PayPal. Shopify adds a PayPal Express button automatically when you enter your PayPal email. PayPal matters for first-time buyers who don’t trust entering card details on an unfamiliar store. The payment methods mix directly impacts checkout conversion.
Consider BNPL. If your products average above $75, enable Shop Pay Installments (0% additional fee for Shopify Payments users) or add Klarna/Afterpay. Installment pricing reframes a $100 purchase as “4 payments of $25,” which lifts conversion on higher-priced products.
Step 3: Set Up Shipping
Settings > Shipping and Delivery. New sellers underestimate how much this affects conversion. Unexpected shipping costs are the #1 reason shoppers abandon checkout.
Shopify pre-creates domestic and international shipping zones. For each zone, choose a rate strategy:
- Free shipping (absorb cost into product price): best for conversion. Works when shipping cost is under 15% of AOV. The shipping cost calculator tells you if this math works for your products.
- Flat rate ($5.99 standard, $12.99 expedited): predictable for customers, simple to manage. Works for products with consistent size and weight.
- Carrier-calculated rates (real-time USPS/UPS/FedEx quotes): accurate but sometimes expensive-looking. Available on the Advanced plan or with third-party apps on lower plans.
Set your package dimensions and weights in the “Packages” section. These feed carrier-calculated rates and shipping label generation. Getting them wrong means either overcharging customers (lost sales) or undercharging (eating the difference). The shipping strategies guide covers carrier selection and rate optimization in depth.
Step 4: Configure Taxes
Settings > Taxes and Duties. Shopify’s automatic tax calculation handles most of the work, but you need to tell it where you have tax obligations.
In the US, you collect sales tax in states where you have “nexus” (physical presence or economic nexus above state thresholds, typically $100K in sales or 200 transactions). Enable automatic tax calculation, add your nexus states, and Shopify calculates and collects the correct rate per order. If you’re unsure about your nexus obligations, TaxJar or Avalara integrate with Shopify for automated multi-state compliance.
Do not skip this step. Uncollected sales tax accumulates as personal liability. Fixing it retroactively costs 2 to 5x more than configuring it at setup. The first store checklist flags tax configuration as the most commonly skipped step that costs new stores the most.
Step 5: Choose and Customize Your Theme
Now the design part. Online Store > Themes.
Shopify’s current default free theme is Horizon, which replaced Dawn in 2026. Horizon includes around 28 section types, AI-generated block support through Shopify Magic, and full block-based editing. Dawn is still available and fully supported if you prefer its simpler structure. Over 20 free themes are available. Start with one.
Free themes are enough to launch. This is the advice most design-focused tutorials won’t give you, but it’s true. A free theme with strong product photos and clear copy outperforms a $350 premium theme with mediocre photos. Premium themes ($140 to $495 one-time) earn their investment after you have revenue and need features like mega menus, advanced filtering, or niche-specific layouts. Spend your launch budget on product photography, not on a premium theme.
Customize the essentials
Click “Customize” on your active theme to enter the visual editor. Focus on four things:
- Logo: Upload a simple logo. If you don’t have one, Shopify’s free logo maker generates one in minutes. A text-based logo is fine for launch.
- Colors: Pick two brand colors and apply them consistently. One primary color for buttons and CTAs, one accent for highlights. Avoid more than three colors.
- Homepage: Build a hero section (what you sell, who it’s for, one CTA button), a featured collection, and 2 to 3 trust sections (shipping policy, reviews, guarantee).
- Navigation: Create a simple menu: Shop (or Shop All), About, Contact, FAQ. Don’t overcomplicate navigation at launch.
Step 6: Add Your Products
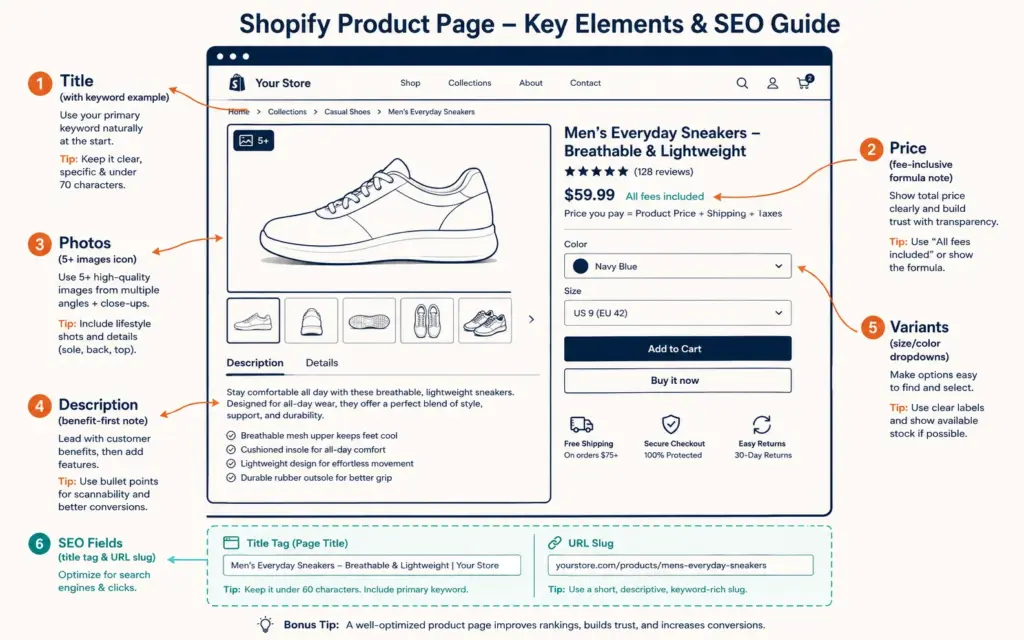
Products > Add Product. For each product, fill in:
Title: Include the primary search keyword. “Personalized Dog Mom Coffee Mug” ranks. “The Sophie” doesn’t (nobody searches your internal product names).
Description: Lead with the buyer benefit, not the product feature. “Keep your coffee hot for 4+ hours on your morning commute” beats “Made from double-walled stainless steel.” The product descriptions guide covers benefit-first copywriting in depth.
Photos: Upload 5+ images per product. First image: product on white or clean background. Remaining images: lifestyle/in-use, close-up details, size reference, packaging. Compress images to WebP under 200KB for page speed. Mobile shoppers decide within 2 seconds whether your product photo earns a closer look. Make those 2 seconds count.
Price: Set using the fee-inclusive formula from the ecommerce pricing strategy guide. Price = Total Cost / (1 – Total Fee %). Don’t set prices by doubling your material cost; that ignores fees, shipping, and marketing costs.
Inventory: Enable “Track quantity” and enter your stock count. Set up low-stock notifications so you reorder before selling out. The demand forecasting model determines how much to stock and when to reorder.
SEO: Scroll to the bottom of the product page. Edit the SEO title and meta description. Include your primary keyword in both. The URL handle (slug) should be short and keyword-focused: “personalized-dog-mom-mug” not “the-sophie-collection-v2-blue.”
Step 7: Create Essential Pages
Online Store > Pages. Create these before launch:
- About page: Your story. Why you started. What you care about. Buyers want to know who they’re buying from, especially on a store they’ve never visited before.
- Contact page: Email address, response time expectation, and a contact form. Shopify has a built-in contact page template.
- Shipping policy: Processing time, shipping methods, estimated delivery times, international availability. Be specific. “Ships in 1 to 3 business days via USPS” beats “Ships quickly.”
- Return policy: What’s returnable, the return window, who pays return shipping, refund vs exchange process. Clear return policies reduce purchase hesitation and pre-sale support questions.
- Privacy policy + Terms of Service: Shopify generates templates under Settings > Policies. Customize them for your business. Required by GDPR, CCPA, and most ad platforms (Meta won’t approve ads without a privacy policy on your site).
Link all policy pages in your site footer. Link Shipping and Returns in the main navigation or on product pages where they reduce purchase hesitation.
Step 8: Install Analytics and Tracking
Settings > Customer Events (or Online Store > Preferences for basic tracking).
Install Google Analytics 4 (GA4) with ecommerce event tracking. This tracks which products visitors view, what they add to cart, and where they drop off in checkout. Without this, you’re flying blind on every marketing dollar. The tracking setup guide walks through GA4 ecommerce configuration step by step.
Install the Meta Pixel if you plan to run Facebook or Instagram ads at any point. Install it now, even if ads are months away. The Pixel starts collecting visitor data immediately, building retargeting audiences before you spend a dollar. Google Search Console is free and takes 5 minutes: submit your sitemap so Google discovers your pages.
Step 9: Place a Test Order
This is the step that separates stores that launch smoothly from stores that spend launch day firefighting.
With Shopify Payments active, enable test mode (Settings > Payments > Shopify Payments > Manage > Enable test mode). Place a real order through your checkout. Add a product to cart. Enter a shipping address. Complete payment. Then check:
- Did the order confirmation email arrive? Is it correct?
- Did shipping rates calculate accurately for your address?
- Did tax calculate correctly?
- Did inventory count decrease by the right amount?
- Does the checkout look right on your phone? (Test on an actual phone, not browser dev tools.)
Fix anything that’s wrong. Then test again. A 5-minute test prevents hours of launch-day customer service emails saying “I placed an order but didn’t get a confirmation” or “Why am I being charged $47 for shipping?” According to DropshippingChampions’ setup guide, most beginners skip the settings steps (taxes, shipping zones, legal pages) and pay for it after launch through customer complaints and compliance issues that are harder to fix under pressure.
Step 10: Remove the Password and Go Live
Shopify password-protects your store during setup. When everything is configured, tested, and ready: Online Store > Preferences > uncheck “Restrict access to visitors with the password.” Your store is now public.
Send your launch announcement to your email list, social media followers, and personal network. Your first 10 to 20 sales will likely come from people you know, not strangers. That’s normal and healthy. Those early orders generate the reviews and social proof that convert the strangers who arrive later through search and ads.
Frequently Asked Questions
Shopify Basic costs $39/month after the trial period (3-day free trial, then $1/month for the first 3 months). Add a custom domain for $14 to $16/year. A free theme costs nothing. Total first-month cost under the promotional pricing: about $16 to $18. Total ongoing monthly cost after the promotional period: $39 plus your domain renewal. Your real startup budget should go toward product inventory and marketing, not the platform itself.
The technical setup (settings, payments, shipping, theme, essential pages) takes 4 to 8 focused hours. Product pages take longer and depend on your catalog size: 15 to 30 minutes per product for photos, descriptions, and pricing. A store with 10 products can be built and launched in 1 to 2 days. A store with 100+ products takes 1 to 2 weeks. The settings and configuration take the same amount of time regardless of catalog size.
Not at launch. Shopify’s free themes (Horizon, Dawn, and 20+ others) are professionally designed, mobile-optimized, and fast. A free theme with strong product photos beats a $350 premium theme with weak photos. Upgrade to a premium theme ($140 to $495 one-time) after you have revenue and need specific features like mega menus, advanced product filtering, or niche-specific layouts that free themes don’t offer.
Use Shopify Payments unless you have a specific reason not to. It eliminates the 0.5 to 2% transaction fee Shopify charges on third-party processors, unlocks Shop Pay (1.7x higher checkout conversion), and activates Apple Pay and Google Pay automatically. The only reasons to use a third-party processor: Shopify Payments isn’t available in your country, or you’ve negotiated better rates through an existing payment provider at high volume.
As few as possible. Every app adds page load time and monthly cost. At launch, you need: an email marketing app (Klaviyo free tier), a reviews app (Judge.me free tier), and Google Analytics integration. That’s it. Add apps only when a specific problem requires one. Stores that install 15 apps at launch end up with slow pages, conflicting scripts, and $200/month in app subscriptions before they’ve made their first sale.
A test order catches configuration errors that are invisible in the admin dashboard: wrong shipping rates, tax miscalculations, broken email notifications, and checkout problems on mobile. Without testing, these errors surface when real customers encounter them, leading to abandoned carts, support tickets, and refund requests on your busiest first day. Enable test mode in Shopify Payments, place a real order, and verify every step of the purchase flow works correctly.
Related Reads
- First Store Checklist
- Shopify vs WooCommerce
- Best Shopify Apps
- Payment Methods
- Tracking Setup
- Ecommerce Pricing Strategy
Enjoying this? Get more like it every week.
One email per week with ecommerce strategies, tool picks, and seller insights. No spam.