
- Product photos are the closest thing to placing your product in a customer's hand. Online shoppers can't touch, hold, or inspect your product. They make purchase decisions based almost entirely on what they see. 93% of consumers rank visual content as the most important factor in buying decisions, and 22% of online returns happen because the product looked different from its photos.
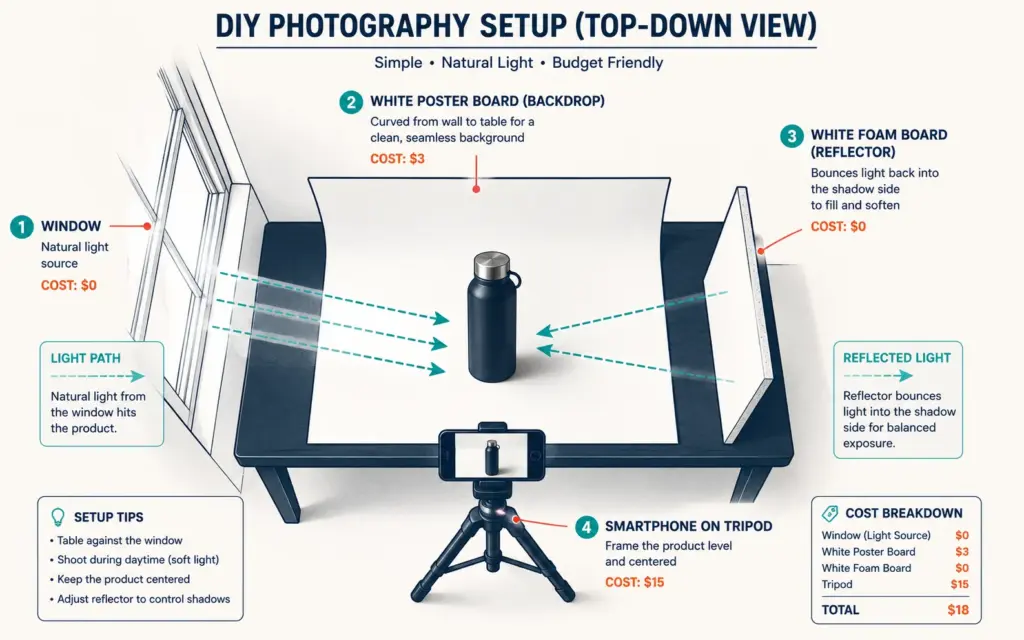
- You don't need a professional studio to shoot good product photos. A smartphone with a decent camera, a window for natural light, a white poster board for the background, and a $15 tripod produce images that work for most product categories. The difference between amateur and professional-looking photos is almost always lighting and consistency, not camera quality.
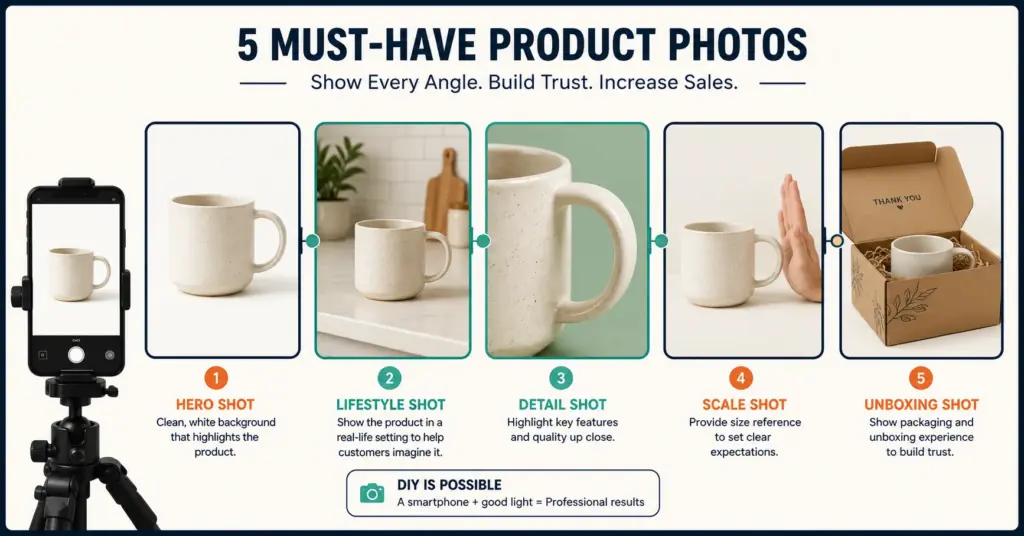
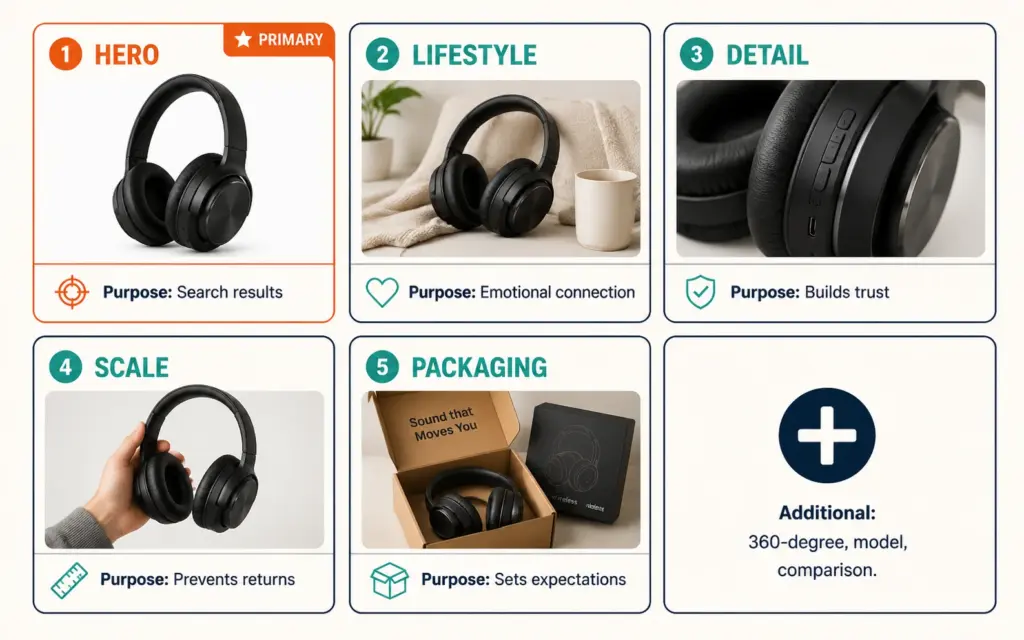
- Every product listing needs 5 types of shots: hero (clean product on white background), lifestyle (product in use or in context), detail (close-up of texture, craftsmanship, or features), scale (product next to a common reference object), and packaging/unboxing (what arrives at the customer's door). Missing any of these forces the buyer to imagine what you should be showing them.
- Platform requirements differ. Amazon requires a pure white background (RGB 255,255,255) for the main image, minimum 1000x1000 pixels, product filling 85% of the frame. Shopify and your own store have no restrictions but benefit from the same clarity standards. Edit every photo: color correct, crop to platform specs, compress to under 200KB for page speed.
Product photography sells your products when you can’t be there to sell them yourself. Every online purchase is a leap of faith. The customer can’t pick the product up, feel the material, read the fine print on the label, or check whether the color matches their couch. Your photos are the substitute for all of that. They build trust or they don’t. They answer questions or they leave them open. And when they leave questions open, the customer clicks the back button and buys from the listing where the photos answered everything.
Shopify’s data consistently shows that listings with 5+ images convert 20 to 30% higher than those with 1 to 2 images. According to Shopify’s DIY photography guide, the biggest mistake new sellers make is thinking they need expensive equipment. They don’t. The difference between amateur and professional-looking product photos is lighting and consistency, not the camera. A well-lit photo from a smartphone beats a poorly lit photo from a $2,000 DSLR every time.
The 5 Product Shots Every Listing Needs
1. The hero shot (white background, product only)
This is your main listing image. Clean, bright, the product filling most of the frame against a pure white or light neutral background. No props. No distractions. Just the product, clearly visible and well-lit. This image determines whether a shopper clicks your listing in search results. On Amazon, it’s mandatory (RGB 255,255,255 white background). On Shopify and Etsy, it’s not required but it’s best practice. Mobile shoppers scroll past dark, cluttered, or ambiguous thumbnails. A clean hero shot stops the scroll.
2. The lifestyle shot (product in context)
Show the product being used or styled in a real environment. A mug on a kitchen counter with morning light. A backpack on someone’s shoulder walking through a city. A candle on a nightstand next to a book. Lifestyle photos help the buyer picture the product in their own life. They answer “what will this look like in my home/on my body/in my routine?” without the buyer needing to imagine it. The product descriptions tell the buyer what the product does. Lifestyle photos show them what it feels like to own it.
3. The detail shot (close-up features)
Zoom in on the details that matter: the stitching on a leather bag, the texture of a fabric, the clasp mechanism on a bracelet, the ingredient label on a skincare product. Detail shots build trust by proving the product is well-made and exactly what the description claims. They also answer the questions that cause returns: “Is the zipper metal or plastic?” “What does the texture actually look like?” Fewer unanswered questions means fewer returns.
4. The scale shot (size reference)
Show the product next to a common reference object or being held in a hand. A 10-inch planter looks the same as a 30-inch planter in a cropped photo. A scale shot eliminates the “it was smaller than I expected” return (the single most common product return reason for small goods). Use a hand, a pen, a coin, or a ruler. Anything that gives the buyer an instant sense of physical size.
5. The packaging/unboxing shot
Show what arrives at the customer’s door. If your product comes in branded packaging, a kraft box with tissue paper, or includes a thank-you card, photograph it. This does two things: it sets expectations (no “I expected a box and got a poly mailer” disappointment) and it elevates perceived value. Products photographed with attractive packaging convert better because the presentation signals care and quality.
DIY Product Photography Setup (Under $50)
You need four things. None of them are expensive.
Camera: Your smartphone. Modern phones (iPhone 12+ or equivalent Android) shoot images at resolutions that exceed what ecommerce platforms require. Set your camera to the highest resolution. Turn off digital zoom (move physically closer instead). Use the main lens, not the ultra-wide.
Light source: A large window with indirect natural light. Position your shooting surface next to the window with light coming from the side (90 degrees to your product). Turn off every other light in the room. Overhead room lights create harsh shadows and yellow color casts. A single large window provides soft, even illumination that makes products look their best. Shoot on overcast days for the softest light, or hang a white bedsheet over the window on sunny days to diffuse direct sunlight.
Background: A large white poster board ($3 at any craft store). Tape one edge to the wall, curve it down onto your table so there’s no visible crease between the wall and surface. This creates an “infinity curve” that looks like a professional continuous backdrop. For lifestyle shots, use surfaces you already have: a wooden cutting board, a marble counter, a textured blanket.
Tripod: A $15 smartphone tripod eliminates camera shake, keeps framing consistent across multiple products, and frees your hands for adjusting the product. Handheld shots introduce slight blur and inconsistent framing that looks unprofessional when a buyer swipes through 5 images.
Lighting: The Factor That Separates Amateur From Professional
Bad lighting is the single most common reason product photos look amateur. Dark shadows, yellow color casts, uneven brightness, and harsh reflections all come from lighting problems.
Natural light (free, best for most beginners): Position your product next to a large window. Use a white foam board on the opposite side of the product as a reflector. It bounces window light back into the shadow side, reducing contrast. The result: soft, even light from both sides that eliminates harsh shadows. This is the same principle professional photographers use with expensive softboxes, just achieved for free.
When natural light doesn’t work: If your window faces direct sunlight (causing hard shadows), shoot on overcast days or diffuse the light with a sheer white curtain. If you shoot at night or in a room without windows, invest in a basic LED light panel ($25 to $50) with a diffuser. Position it at 45 degrees to your product. Avoid using your room’s overhead lights; they create top-down shadows that flatten your product and distort colors.
Consistency matters more than perfection. If all your product photos have the same lighting, background, and style, your store looks professional even if individual images aren’t magazine-quality. If every photo has different lighting and a different background, your store looks chaotic regardless of individual image quality. The ecommerce tools and tech stack includes free editing tools like GIMP and Canva that handle basic brightness and color correction.
Editing: Non-Negotiable Even for Great Shots
Every photo needs at minimum: white balance correction (so whites look white, not yellow or blue), exposure adjustment (bright enough to see details, not blown out), and cropping to platform specifications. Budget 15 to 30 minutes of editing per product. Skip this step and even good photos look slightly off.
Free editing tools: GIMP (Photoshop alternative, full-featured, steeper learning curve), Canva (simple background removal and adjustments), iPhone/Android built-in editors (surprisingly capable for white balance and exposure). Paid tools worth considering: Adobe Lightroom ($10/month, batch editing saves hours on large catalogs), Remove.bg ($0.40/image for automated background removal to pure white).
Compression: Export images at 2000×2000 pixels (Amazon and Shopify optimal size) in WebP or JPEG format, compressed to under 200KB per image. Large image files slow your page load speed, which kills mobile conversion. The mobile CRO guide covers how page speed directly affects revenue: 53% of mobile visitors leave if a page takes over 3 seconds to load, and uncompressed images are the #1 cause of slow product pages.
Platform-Specific Requirements
Amazon: Main image must have pure white background (RGB 255,255,255). Product must fill at least 85% of the frame. Minimum 1000×1000 pixels (2000+ recommended for zoom). JPEG format preferred. No text, logos, watermarks, or borders on the main image. Secondary images can include lifestyle, infographic, and comparison images.
Etsy: No strict background requirement, but clean backgrounds rank better. Minimum 2000 pixels on the shortest side. First image is the thumbnail in search results: make it count. The Etsy SEO guide explains how your thumbnail photo directly feeds your listing quality score and search ranking.
Shopify/DTC stores: No platform restrictions. Use 2000×2000 square images for consistency. WebP format for optimal speed. Enable pinch-to-zoom for mobile shoppers (42% of mobile visitors zoom at least one product image). Swipe-native horizontal galleries outperform thumbnail-based galleries on mobile.
When to Hire a Professional
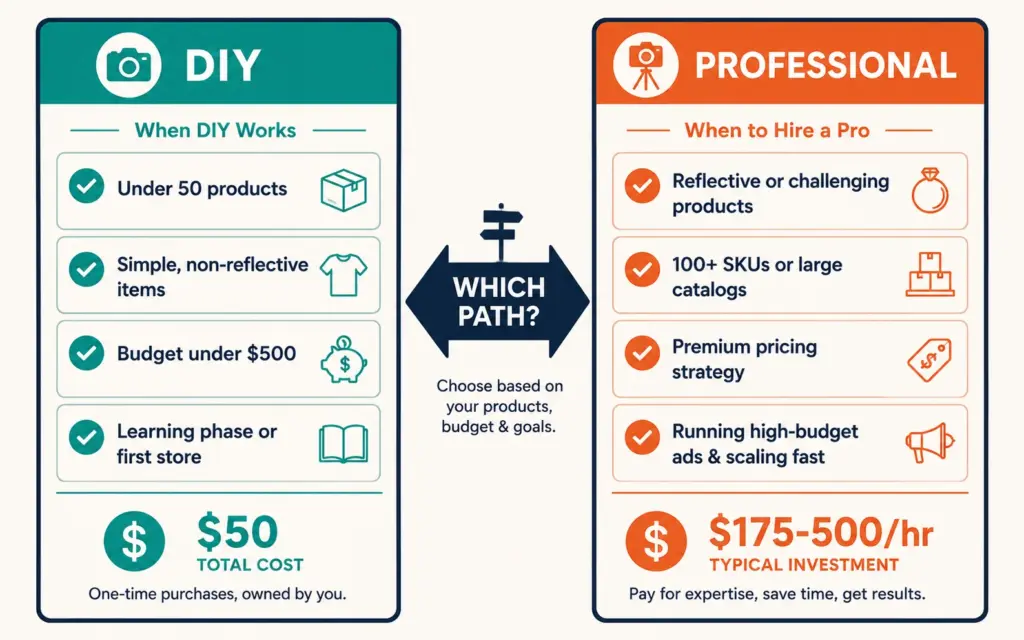
DIY works for most products at most stages. Hire a professional when:
- Your products are difficult to photograph (reflective surfaces like jewelry or glass, very small items, clothing on models)
- You need 100+ product photos at consistent quality (DIY breaks down at volume because lighting conditions change between sessions)
- Your product is premium-priced ($100+) and photos need to justify the price point
- You’re running high-budget paid ads where creative quality directly impacts ROAS
Professional product photography costs $175 to $500 per hour for studio work, or $25 to $75 per product through product photography services. AI photography tools have emerged in 2026 that generate lifestyle and background variations from a single product photo at $1 to $5 per image, filling the gap between full DIY and full professional shoots. According to BigCommerce’s photography guide, professional photography drives 75% higher conversions and shoppers are 3x more likely to buy when they can see products from multiple angles.
The ad creative tips quality depends heavily on your product photography. The same image that works on your product page becomes your Facebook ad, your Instagram post, your Google Shopping thumbnail. Investing in one strong photo set pays across every channel. The UGC strategy can supplement professional photos with authentic customer-generated content that provides social proof alongside your polished brand images.
Frequently Asked Questions
Yes. Modern smartphones (iPhone 12+ or equivalent Android) shoot at resolutions that exceed ecommerce platform requirements. The difference between amateur and professional photos is lighting and staging, not camera quality. Use natural window light, a white background, and a $15 tripod. Keep the lens clean, shoot at the highest resolution, use the main camera lens (not ultra-wide), and avoid digital zoom. Phone cameras are genuinely capable of producing images that sell products.
White or light neutral for your main hero image. A large white poster board ($3 at a craft store) taped to the wall and curved onto your table creates a continuous backdrop. Amazon requires pure white (RGB 255,255,255) for main images. For lifestyle shots, use real surfaces: wooden tables, marble countertops, textured fabrics. Keep backgrounds consistent across your catalog so your store looks cohesive.
Minimum 5 per product: hero (white background), lifestyle (in context), detail (close-up features), scale (size reference), and packaging/unboxing. Listings with 5+ images convert 20 to 30% higher than those with 1 to 2 images. If your product has multiple colors, variants, or use cases, add images for each. More relevant images reduce uncertainty, which reduces both bounce rate and return rate.
2000×2000 pixels (square) is the safe standard across platforms. Amazon requires minimum 1000×1000 but recommends 2000+ for the zoom function. Export as WebP or JPEG, compressed to under 200KB per image. Larger files slow page load speed, especially on mobile. Square images work across all platforms (Amazon, Shopify, Etsy, social media) without needing separate crops for each channel.
Two steps: shoot on a white poster board with bright, even lighting (window light plus a white reflector board on the shadow side), then use a free background removal tool (Remove.bg, Canva, or Photoshop’s “Remove Background” feature) to replace any remaining gray or off-white with pure white. This two-step approach produces Amazon-compliant white backgrounds without a lightbox or studio setup.
DIY for most new and small stores. Professional for: reflective/difficult products (jewelry, glass), large catalogs (100+ products at consistent quality), premium-priced products ($100+ where photo quality must justify the price), and high-budget ad campaigns. Professional product photography costs $175 to $500/hour or $25 to $75/product. If your hourly rate is above $30 and you have more than 50 products, the math favors hiring out. Under 50 products with non-complex items, DIY saves money without sacrificing quality.
Related Reads
- Product Descriptions
- Mobile CRO
- Amazon Listing Optimization
- Etsy SEO Guide
- Ad Creative Tips
- UGC Strategy
Enjoying this? Get more like it every week.
One email per week with ecommerce strategies, tool picks, and seller insights. No spam.